Plaubel Makina 67
6x7cm Medium-Format Folding Camera
Sample Images Introduction Specifications
Performance User's Guide Recommendations
Plaubel Makina 67. (80mm f/2.8 lens, 58mm filters, ten shots per roll of 120 film, 50 oz./1,418g).
I'd get my next Plaubel Makina 67 at at eBay (see How to Win at eBay) or get it at KEH.
This free website's biggest source of support is when you use these links, especially this link directly to the Plaubel Makina 67 at eBay (see How to Win at eBay) or at KEH when you get anything, regardless of the country in which you live. Thanks! Ken.
April 2026 Better Pictures HASSELBLAD Zeiss Contax Mamiya LEICA Nikon Canon Sony Fuji all reviews
Why Fixed Lenses Take Better Pictures

Sample Images top
Sample Images Introduction Specifications
Performance User's Guide Recommendations
These are just snapshots; my real work is in my Gallery.
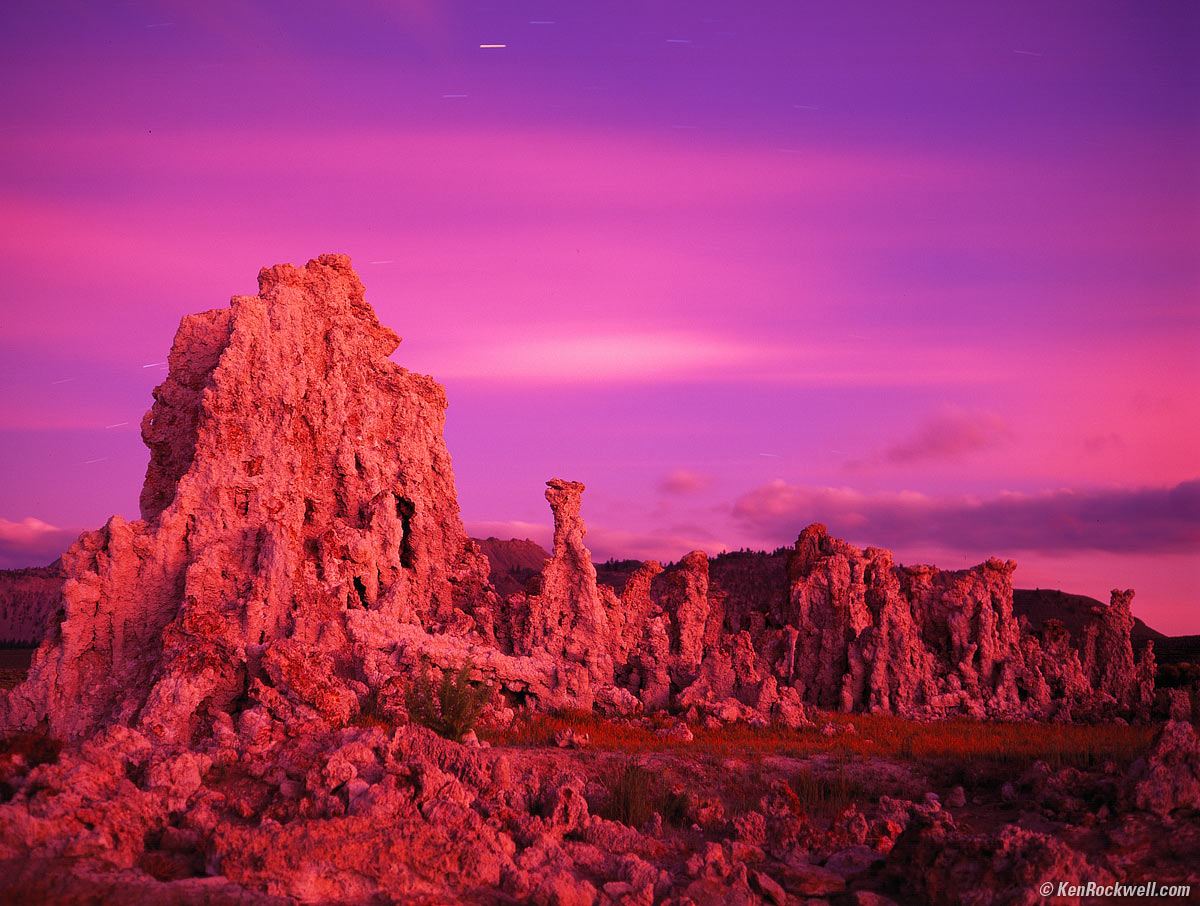
Mono Lake, July 1993. Bigger. Shot on Fuji Velvia. Tech details.
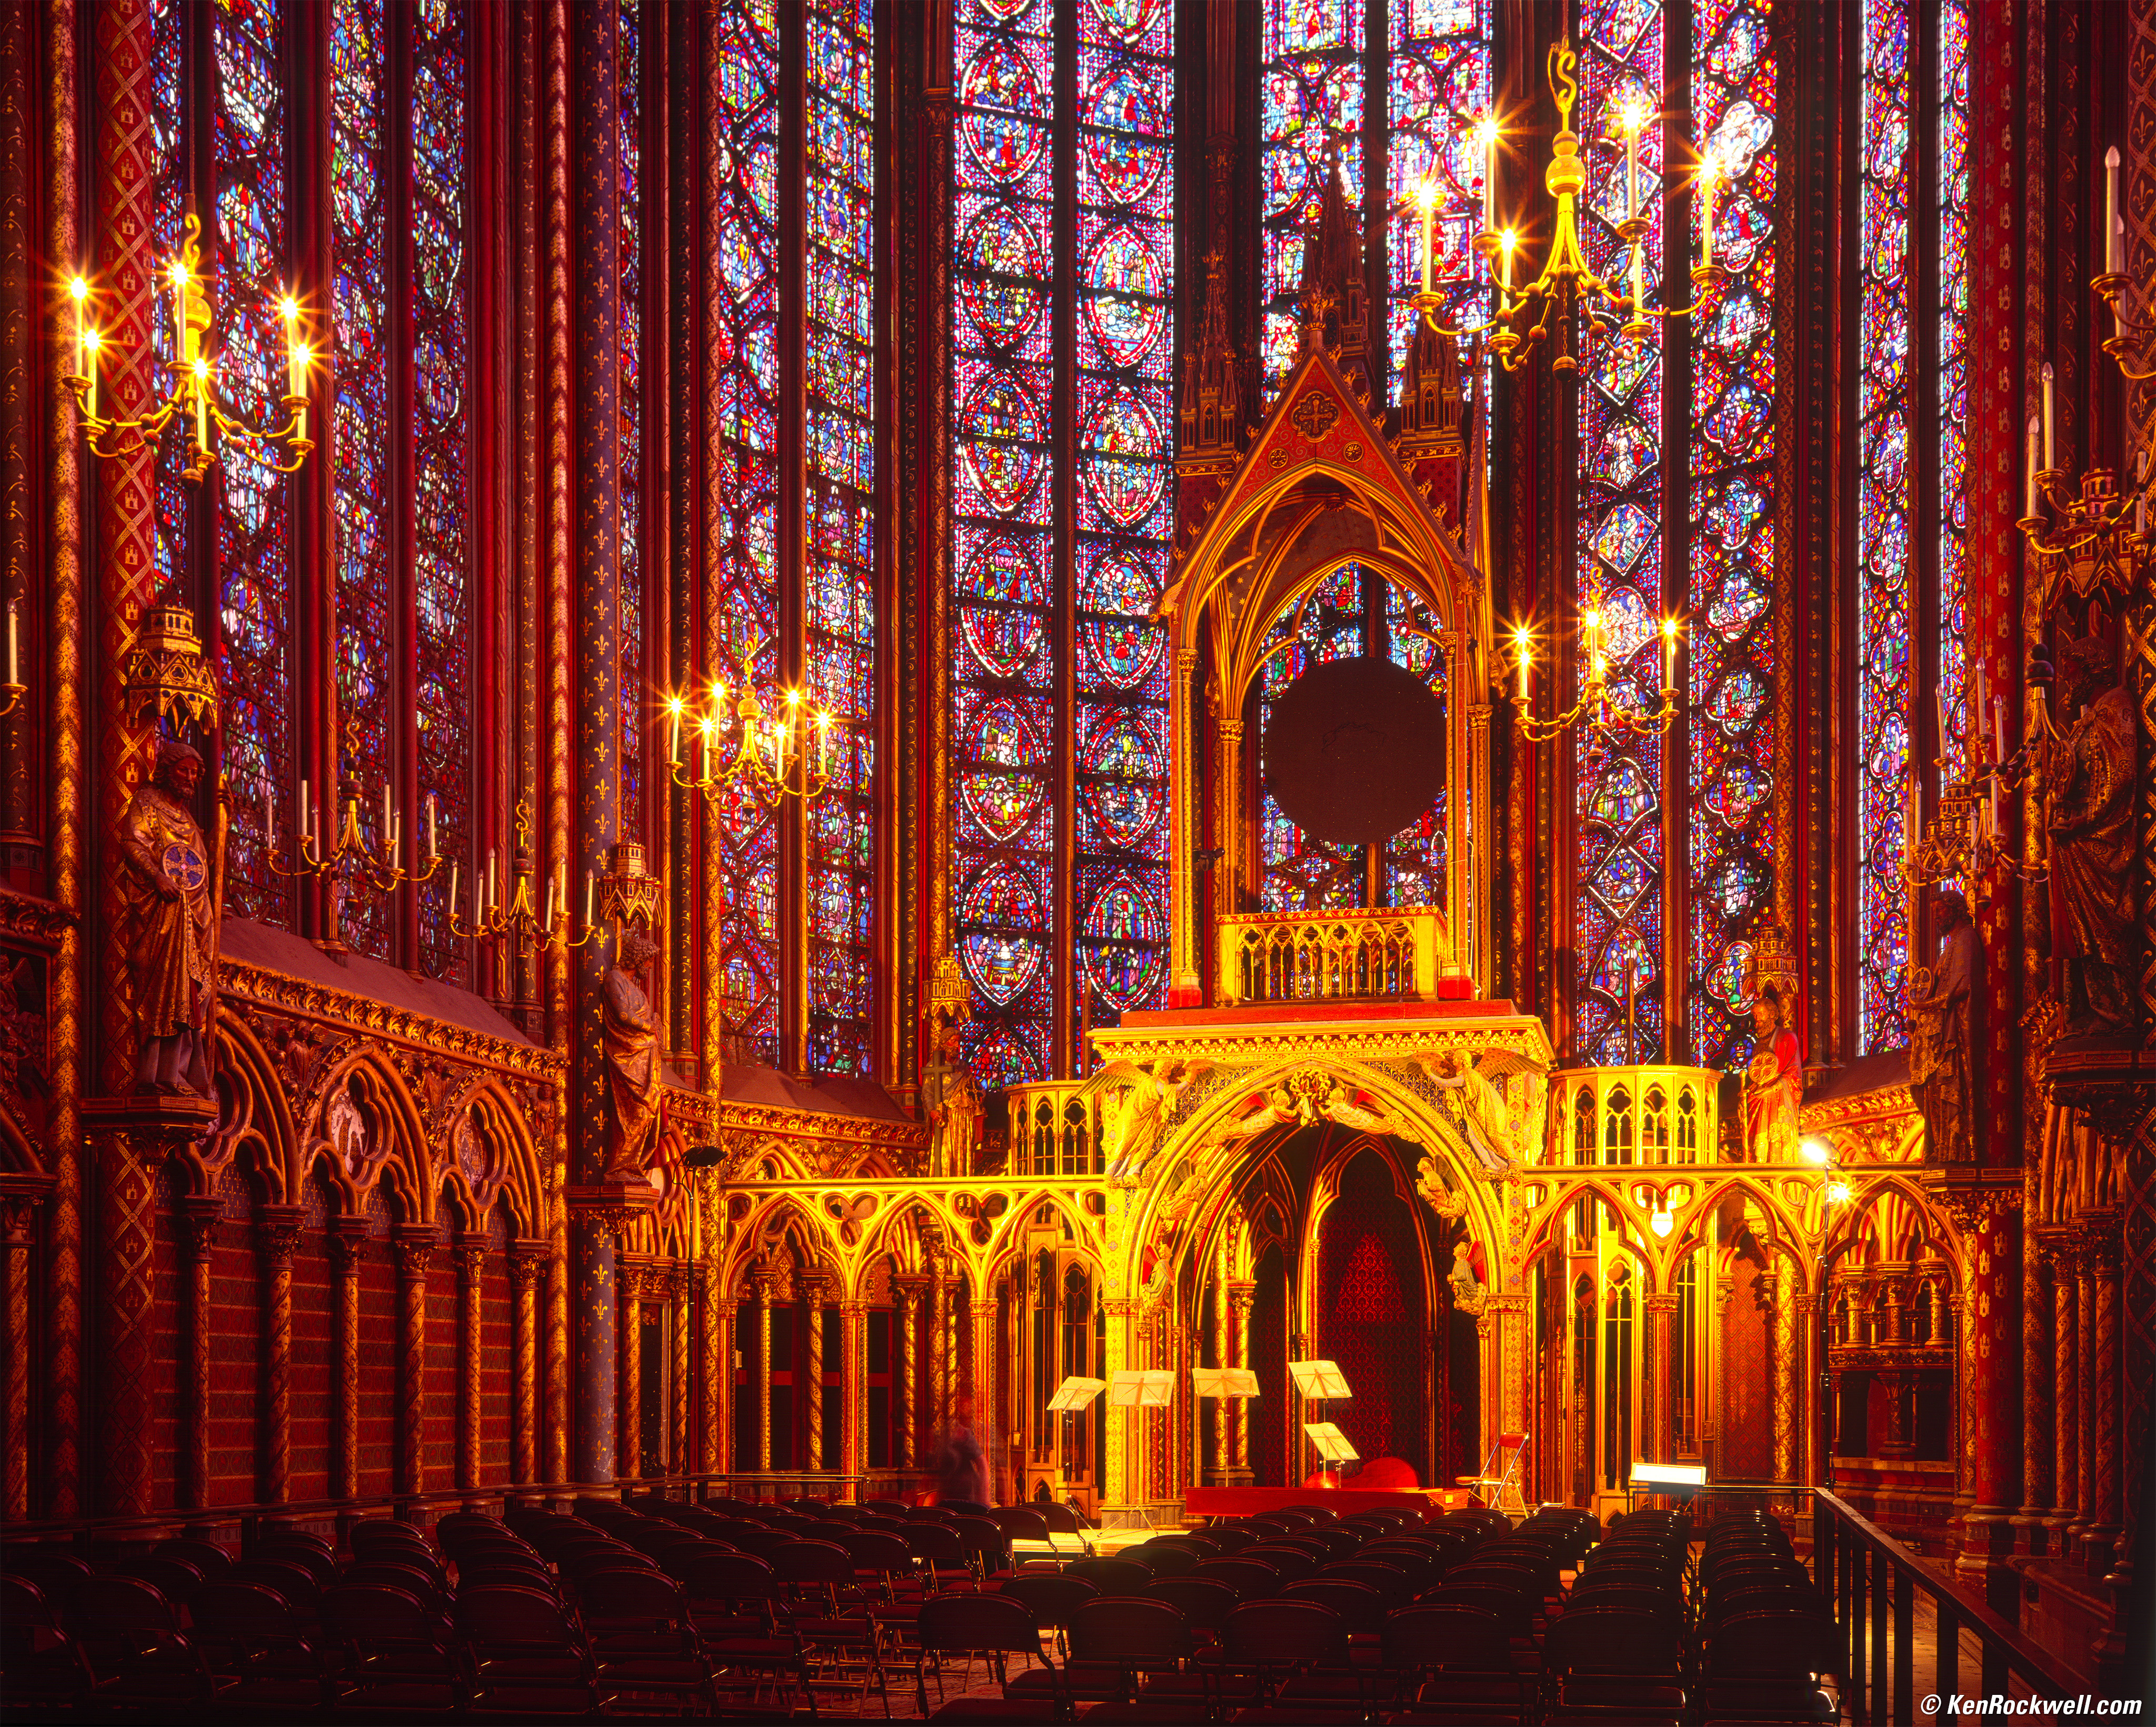
La Sainte Chapelle, Paris, France, Juin 1997. bigger. huge 4,096 pixel version (Fuji Velvia).
Introduction top
Sample Images Introduction Specifications
Performance User's Guide Recommendations

Adorama pays top dollar for your used gear.
I use these stores. I can't vouch for ads below.
|
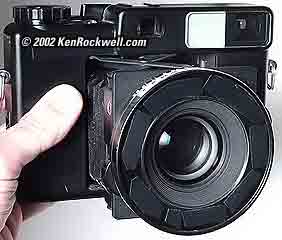
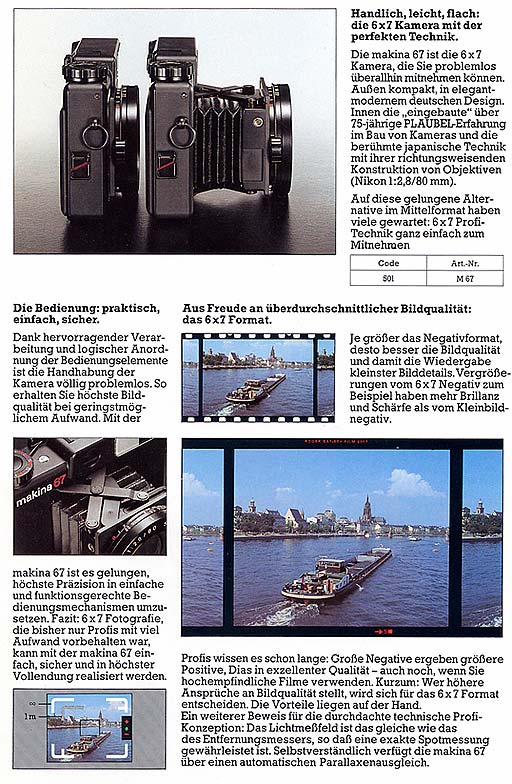
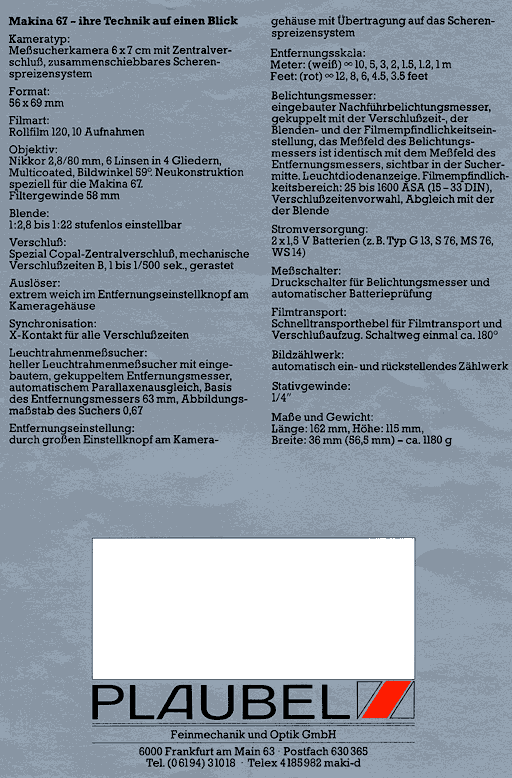
This is the world's most compact modern 6×7 camera. It's a collapsible medium format mechanical rangefinder camera with a built-in manual meter that gets ten shots on a roll of 120 film.
I used it for a three week trip to France and only once missed not having other than just one lens on it. All the photos at my France gallery pages were made with it. It fits in a large cargo pocket!
The camera was designed in Germany and made in Japan around the 1980s.
I'm first going to talk about the Plaubel Makina 67 in general, then review it, and then disclose secret tricks to get the very best performance out of this gem.
There are three versions:
67: This is the first model, and the one I am discussing here.
W67: The same thing as the 67, but with a slightly wider 55mm f/4.5 lens instead.
670: A newer version of the 67 adding the ability also to use 220 film, has a cable release socket in the middle of the shutter button (rather than the top right side of the body) and has a hot shoe for flash.
Ultimately they are all the same; I see no need for the newer or wide models unless some feature really strikes you.
I'd get my next Plaubel Makina 67 at at eBay (see How to Win at eBay) or get it at KEH.
Specifications top
Sample Images Introduction Specifications
Performance User's Guide Recommendations
I'd get my next Plaubel Makina 67 at at eBay (see How to Win at eBay) or get it at KEH.
Lens
It has a multicoated six element, four group Nikkor 80mm f/2.8 lens with a 58mm filter thread and weighs .
Filters
Metal 58mm filter thread.
Diaphragm
Five blades.
No click stops.
f/2.8 to f/22.
Shutter
Mechanical leaf shutter with clicks at 1 - 1/500 and B.
There is an X-sync PC terminal on the side. X Flash sync goes all the way up to 1/500, twice as fast as a Nikon F5 or Canon EOS 1 V.
Focus
Focus is with the wheel integral with the film advance lever on the top of the camera.
Metering
Metering is with three LEDs ( + o - ) in the viewfinder activated by pressing the meter button on the camera back near the viewfinder window. It takes two S76 or A76 or EPX76 button cells to run the meter. They last almost forever.
Weight
50 oz. (1,418g) or 3 pounds, 2 ounces.
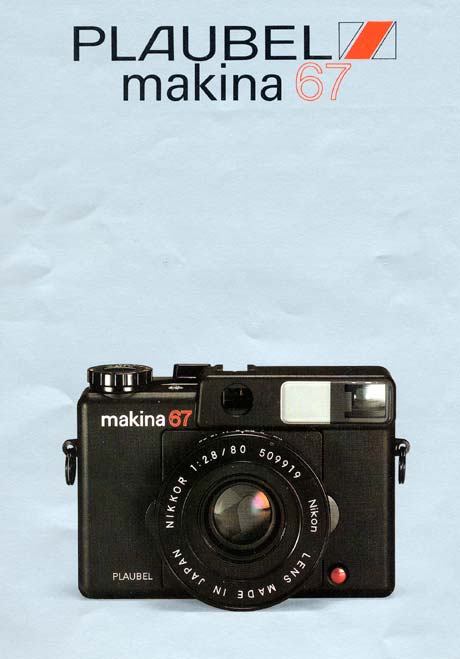
Brochure (click any to enlarge)
Prices, April 2026
About $2,120 at eBay if you How to Win at eBay.
The "wide" version with a 55mm f/4.5 lens sells for more, about $3,270 at eBay if you How to Win at eBay.
The 670 goes for about $3,270 at eBay if you How to Win at eBay.
Performance top
Sample Images Introduction Specifications
Performance User's Guide Recommendations
I'd get my next Plaubel Makina 67 at at eBay (see How to Win at eBay) or get it at KEH.
The shutter is very accurate, typical for a good mechanical one:
1
- 1/60: within 1/6 stop of perfect
1/125, 1/250: slow 1/3 stop
1/500: slow 2/3 stop (This is typical for mechanical leaf shutters)
Lens
sharpness on Velvia with a 22x loupe:
2.8 G
4 VG
5.6 VG
8 - 16 up E
The lens is not quite as sharp as the Mamiya 7 80mm lens, if you prefer photographing test patterns.
Handheld
sharpness under a 22x loupe:
1/250, 1/500: always E
1/ 125: E results 9 times out of 10
1/60: usually E to VG results
1/30 & 1/15: half of the exposures are blurry, half are OK
1/8: Blurry to OK to G
Handheld
sharpness under a 3x loupe:
1/60 and up: E
1/30, 1/15 usually OK,
1/8 NG-OK
1/4 NG
Rangefinder performance: I get accurate, repeatable results at f/2.8. This means you can use the fast maximum aperture and get sharp images. My rangefinder is calibrated great, unlike the Mamiya 7 whose rangefinder usually requires regular calibration.
User's Guide top
Sample Images Introduction Specifications
Performance User's Guide Recommendations
I'd get my next Plaubel Makina 67 at at eBay (see How to Win at eBay) or get it at KEH.
Lens Hoods
I use a cheap folding normal rubber one.
We are lucky here: the huge shutter that surrounds the lens means that the viewfinder is designed not to vignette even with the presence of the shutter. Therefore hoods don't need to be designed with those stupid cut outs like the Leica and Mamiya, and any regular screw-in 58mm hood ought to work great.
Tricks
How to Open and Close the Camera
To Open:
1.)
Press the red button on the front of the camera.
2.) Pull the lens straight out till it clicks.
To Close:
1.)
Set the focus knob (the ring around the shutter button on the top right
of the camera) to infinity. That's indicated by the sideways figure
"8" symbol. This make the lens contract just a little bit.
2.) Now press the front button and gently collapse the lens into the
camera. It should lock in with a click.
Operation
Just make sure only to set full-stop speeds on the shutter.
Never change shutter speeds too rapidly because all sorts of gizmos inside are moving around as you change the speeds. Avoid really stupid things like only charging the shutter halfway and then adjusting it, but otherwise, it's like all modern shutters that may be adjusted charged or uncharged.
The aperture is also just like a mechanical view camera shutter: the diaphragm adjusts anytime you twiddle the ring. You also may set any intermediate (half, third, quarter, sixth, etc.) stop you like, unlike with the shutter.
Depth of Field
If you are concerned about ultimate sharpness when you need depth of field, use f/22 when the camera's depth of field scale says use f/8. This will give you the diffraction limited results as described here. For shallower subjects that don't extent to the camera's f/8 marks follow the recommendations described at the page just mentioned, or just get over it and be happy using f/22.
Metering
I've found some neat tricks that allow a lot of metering ease with the Plaubel 67. All you need to do is add some new scales on little pieces of paper to your camera.
I'm presuming that you have fluency in exposure and zone system techniques; I won't attempt to explain basic or even intermediate photography here.
If you just add a few paper scales to your camera you will be able to meter exposures using the zone system with direct readout to 30 second time exposures. You will be able to use the Plaubel meter as a spot meter reading in Pentax LV values, or use the Pentax numbers directly with your Plaubel. You will even be able to read to light levels much less than you could before for nighttime photography and compensate for reciprocity failure. With experience you will be able to eyeball exposures without the meter or battery, with any film speed, light condition and shutter and f/stop.
Potential Meter Inaccuracies
The Plaubel meter reads through the rangefinder window. It is a spot meter reading only the area of the RF spot. This is good in the hands of an artist, bad for a casual snapshooter. It also is overly sensitive to blue light, since it is reading the blue light not reflected to the viewfinder. That's why the RF spot appears yellow. Therefore if your light is predominantly blue the meter will read high and underexpose your work by a stop or two. I have only found this as a problem after dusk when the world becomes very blue for a half hour or so.
I said this was for advanced artists. For you rookies make sure to remember to compensate for filters the old fashioned way: by resetting the ASA dial. For a graduated ND filter of 0.6 density, set to one stop slower ASA.
For real rookies, remember to take off the lens cap while you're at it. This sounds obvious, but is an easy one to forget since the front of the lens is much bigger than the filter attachment. You won't see the cap when you look through the finder. I suggest painting your cap a bright color so people tell you to take it off if you try to take their picture! I leave the cap on pretty often.
Time Exposure Scale
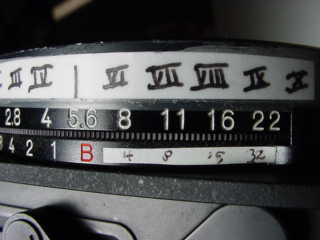
Figure 2.) Note lower scale attached to shutter speed ring indicating long exposure times.
This will allow you to calculate long exposure times at small apertures. You will have to time these yourself in bulb, but at least you will be able to use the meter in very dim light.
Add a scale to the shutter speed ring that goes to the right of the B end of the scale. I use Avery removable labels. You hackers can also use 3M 3.5" diskette label paper cut with scissors.
Set the camera to B and to f/5.6. On your paper scale make a mark of "4" below the f/8 position, "8" below f/11, "16" below f/16 and "32" below f/22. Now when you meter you can read the time exposures (in seconds) needed directly below the corresponding f/stops.
As an example suppose your metered exposure is f/4 at 1 second (as shown) and that you want to use f/22 for depth of field. What exposure time do you need? Simply read your new scale below f/22 and it reads "32." Set the camera to f/22, set the shutter to B and make a 32 second exposure. Easy, eh?
The "B" now signifies a 2 second exposure.
If your exposure is "B" (2 seconds) at f/4 you need to use 1 minute at f/22, not marked on the scale because it doesn't fit.
If your exposure is "B" (2 seconds) at f/2.8 you need to use 2 minutes at f/22, not marked on the scale because it doesn't fit.
I will be doing the same thing to my Mamiya 6 and 7; you just make the scale for each lens below or above the aperture ring. You may want to mark it 2x, 4x, 8x, 16x, etc. to signify that one needs to use that much longer exposure with the smaller apertures.
Zone System Scales
I made mine by hand. Reader Derek Au made his on his Brother laminated tape labeling machine, so if you're nice and email him maybe he'll send you a set.
Zone System? Easy. I won't teach you the zone system (read about it here), but presuming you know it, all you have to do is put a zone scale on the top front of the lens barrel in front of the aperture scale.

Figure 3.) Zone metering scale.
Just mark the appropriate zones one stop apart on this scale. You'll have to move the aperture setting in the middle of this. Tough.
To place something on a zone: make a meter reading and not the aperture indicated. Then slide the aperture ring until that same f/stop appears below the desired zone.
To see the brightness range of a subject and to see where things fall choose a shutter speed that allows all the parts of the image to be metered at that speed. Note the indicated f/stop for each part of the image. Now as you rotate the ring you can see where all the points fall according to the scale. You need not use this as your final exposure; just use an equivalent exposure and the zonal relationships remain the same.
Pentax Spotmeter and LV Scales
For compatibility with Pentax and LV numbers just add a third long scale to the bottom of the aperture ring opposite the ASA index red dot.
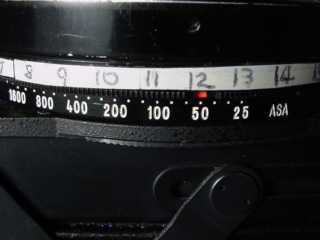
Figure 4.) LV scale.
I saved this for last as it is the skinniest and hardest to stick on.
Set the camera to ASA100, f/22 at 1/500.
Now draw a tiny "18" on the paper you just stuck to the aperture ring next to the red dot. Draw a "17" above ASA 200, a "16" above ASA 400, a "15" above ASA 800 and a "14" above ASA 1600.
To continue the scale set the camera to f/4 at a 1/125. Draw a "13" above ASA 25, a "12" above ASA 50, an "11" above 100, a "10" above 200, a "9" above 400, an "8" above 800 and a "7" above 1600.
Set the camera to 1 second at f/4. Now draw a "6" above ASA 25, a "5" above 50, a "4" above 100, a "3" above 200, a "2" above 400, a "1" above 800, and a "0" above 1600.
You can use the same procedure if you need higher or lower LV numbers.
Now for whatever light condition you encounter the Pentax Light Value (LV) number is the number next to the dot.
Of course you must set the film speed on the Plaubel if you want to photograph with the Plaubel.
If all you want to do is get a number to transfer to or compare with your Pentax then you can skip setting film speed on your Plaubel.
If you make a meter reading with the Plaubel, the number next to the red dot is what the Pentax meter would read, regardless of film speed setting.
If you prefer to use your Pentax meter then just set the number next to the read dot on the Plaubel and you can SKIP the calculator dial of the Pentax meter. You do in this case need to remember to set the film speed on the Plaubel. Way cool, eh?
The Light Values (LVs) on the Pentax meter and your new Plaubel are constant with the light value of the scene and do not vary with film speed. These are different from Exposure Values (EV) that vary with film speed. At ASA 100 EV = LV, for each stop of film speed difference EV goes up or down one number while LV stays the same. For instance, normal ugly full sunlight is LV15. At ASA100 you'd use EV 15, but with ASA 50 you'd use EV14 and with ASA 400 you'd use EV17.
You can forget about this, since both the Pentax and your new Plaubel scales figure this for you. Just remember that Hasselblad EVs are different than Pentax/Plaubel LVs.
If making an exposure on the Plaubel from these LV numbers you do need to set the film speed on the camera.
See also my EV and LV page.
Since LVs only change with the light and nothing else, you will, with experience, learn what all the various light conditions read on these meters.
Therefore if you loose your battery you can guess, and often even outguess, the meter.
For instance, a normal side-lit daytime value is LV14. Ugly direct noontime sun is LV15. Cloudy is LV12. Indoors it might be LV7. Night street scenes are usually LV3. With experience you'll just recognize scenes for what they are automatically.
You can just set your film speed, set that number to the red dot on the Plaubel and off you go! You can even use this to calculate the exposure for your Nikon when it's batteries die.
If you are less formal you could just draw little suns and clouds and moons at the right spots instead of LVs. Set the sun at 14-1/2, the cloud at 12-1/2, an indoor window symbol at 7, and a moon for night street scenes at 2. Of course vacant landscapes with the full moon only are about -3, that's not on your scale.
Low Light Meter Reading Tricks
To read light levels below the range of the meter, just set the meter to a higher ASA and add the appropriate compensation. You'll have to do that in your head.
This is helpful for night shooters with slow film and applies to most cameras, not just the Plaubel.
Just set the camera to a film speed several stops faster than your film, and make sure to give that same number of stops more exposure than the meter reads.
Reciprocity Failure Calculations
For reciprocity failure I just add a chart to each camera. I find no need to compensate on Velvia up to a minute or so, and longer than that I add a stop or two depending on how rushed I am.
For T-Max 100 and TXP I just attach a scale the reads Metered (Use) 1s (1s), 2s (2.5s), 4s (5s), 8s (12s), 15s (25s), 30s (1m), 1m (2.5m), 2m (5.6m), 4m (12m).
In other words, if your metering after all these tricks says use a 15 second exposure on TX, use a 25 second exposure instead. Per my tests this gives the same zone V density. Of course other zones may vary, but heck, the people who worry about that are the ones who never really get out and make pictures.
I use no development changes; remember this is rollfilm. I don't worry about any contrast increases per frame, they are yours to worry about. If I worried about this I'd experiment with the Tiffen Ultra Contrast series of filters. They provide the same results as pre exposure with only one exposure.
Film Box Reminder Holder
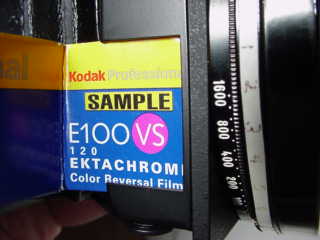
Figure
5.) Box top holder. I never use Kodak film,
I just happened to have a box handy for this photo.
There is a slot in the front lens standard to hold a film box top. It even collapses into the camera when closed, preventing it from blowing away. I don't use Kodak color film, I just didn't have any Velvia box tops handy for this illustration.
Recommendations top
Sample Images Introduction Specifications
Performance User's Guide Recommendations
I'd get my next Plaubel Makina 67 at at eBay (see How to Win at eBay) or get it at KEH.
I use a clear (UV) protective filter instead of a cap (exactly like an iPhone) so I'm always ready to shoot instantly. I only use a cap when I throw this in a bag with other gear without padding — which is never. The UV filter never gets in the way, and never gets lost, either.
The very best protective filter is the Hoya multicoated HD3 58mm UV which uses hardened glass and repels dirt and fingerprints.
The very inexpensive Hoya multicoated 58mm UV works as well but doesn't stay as clean, and for very basic use in filthy environments the uncoated Tiffen 58mm UV works almost as well and is much easier to clean.
For a very low cost filter suited to the price of this lens, also consider the uncoated (plain glass) Chiaro 58mm 90-UVAT filter for five bucks or the multicoated Chiaro 58mm 95-UVAT for $8.50.
For color slides like Fuji Velvia 50, I'd use a 58mm 81A outdoors.
To make clouds look natural with B&W film outdoors I use a 58mm Hoya HMC K2 Yellow, or usually a 58mm B+W MRC 550nm/040 Wratten #16 Orange for a stronger effect, or a 58mm B+W MRC 590nm / R59 / #90 Wratten #25 for the most dramatic skies or to hide skin imperfections.
Filters last a lifetime, so you may as well get the best. The Hoya HD3 stays cleaner than the others since it repels oil and dirt.
All these filters are just as sharp and take the same pictures, the difference is how much abuse they'll take and stay clean and stay in one piece. Since filters last a lifetime or more, there's no reason not to buy the best as it will last you for the next 50 years. Filters aren't throwaways like digital cameras which we replace every few years, like it or not. I'm still using filters I bought back in the 1970s!
I'd get my next Plaubel Makina 67 at at eBay (see How to Win at eBay) or get it at KEH.
More Information top
Sample Images Introduction Specifications
Performance User's Guide Recommendations
I'd get my next Plaubel Makina 67 at at eBay (see How to Win at eBay) or get it at KEH.
Service & Repair
As of 2008, Plaubel Frankfurt moved around the corner to:
PLAUBEL GmbH
Carl-Zeiss-Straße. 5
60388 Frankfurt am Main
GERMANY
Tel 06109-31018
Fax 06109-36368
Readers tell me that the service is spectacular.
In 2004 they were at:
PLAUBEL Feinmechanik und Optik GmbH
Borsigallee 37
60388 Frankfurt am Main
GERMANY
Tel 06109-31018
Fax 06109-36368
For repair service in the USA try calling (212) 982-3177. "Photo repairs" also called Nippon Photo Clinic claims to be the only North American repair station. They say repair "is not cheap." They tell me that Plaubel didn't use a flexible circuit board but instead used 2 dozen wires. Because of that they have to take it all apart just to calibrate the rangefinder. It's very common that the film winding is not strong. It costs $300 to fix winding. NPC is at:
Nippon Photo Clinic SVC
920 Broadway #705
New York NY USA
(212) 982-3177.
For replacement bellows also look here.
© Ken Rockwell. All rights reserved. Tous droits réservés. Alle Rechte vorbehalten. Alla rättigheter förbehållna. Toate drepturile rezervate. Niciun vampir nu a fost implicat în crearea acestei lucrări. Omnia jura reservata. Ken Rockwell® is a registered trademark.
Help me help you top
I support my growing family through this website, as crazy as it might seem.
The biggest help is when you use any of these links when you get anything, regardless of the country in which you live. It costs you nothing, and is this site's, and thus my family's, biggest source of support. These places have the best prices and service, which is why I've used them since before this website existed. I recommend them all personally.
If you find this page as helpful as a book you might have had to buy or a workshop you may have had to take, feel free to help me continue helping everyone.
If you've gotten your gear through one of my links or helped otherwise, you're family. It's great people like you who allow me to keep adding to this site full-time. Thanks!
If you haven't helped yet, please do, and consider helping me with a gift of $5.00.
As this page is copyrighted and formally registered, it is unlawful to make copies, especially in the form of printouts for personal use. If you wish to make a printout for personal use, you are granted one-time permission only if you PayPal me $5.00 per printout or part thereof. Thank you!
Thanks for reading!
Home Donate New Search Gallery Reviews How-To Books Links Workshops About Contact