Nikon Z6 III User's Guide
Z9 Z8 Z7 II Z6 III Z6 II Z5 II Zƒ Z7 Z6 Z5
DX (APS-C): Zƒc Z50 II Z50 Z30
Z System Z Lenses All Nikon Lenses Flash
Older Z6 & Z6 II User's Guides
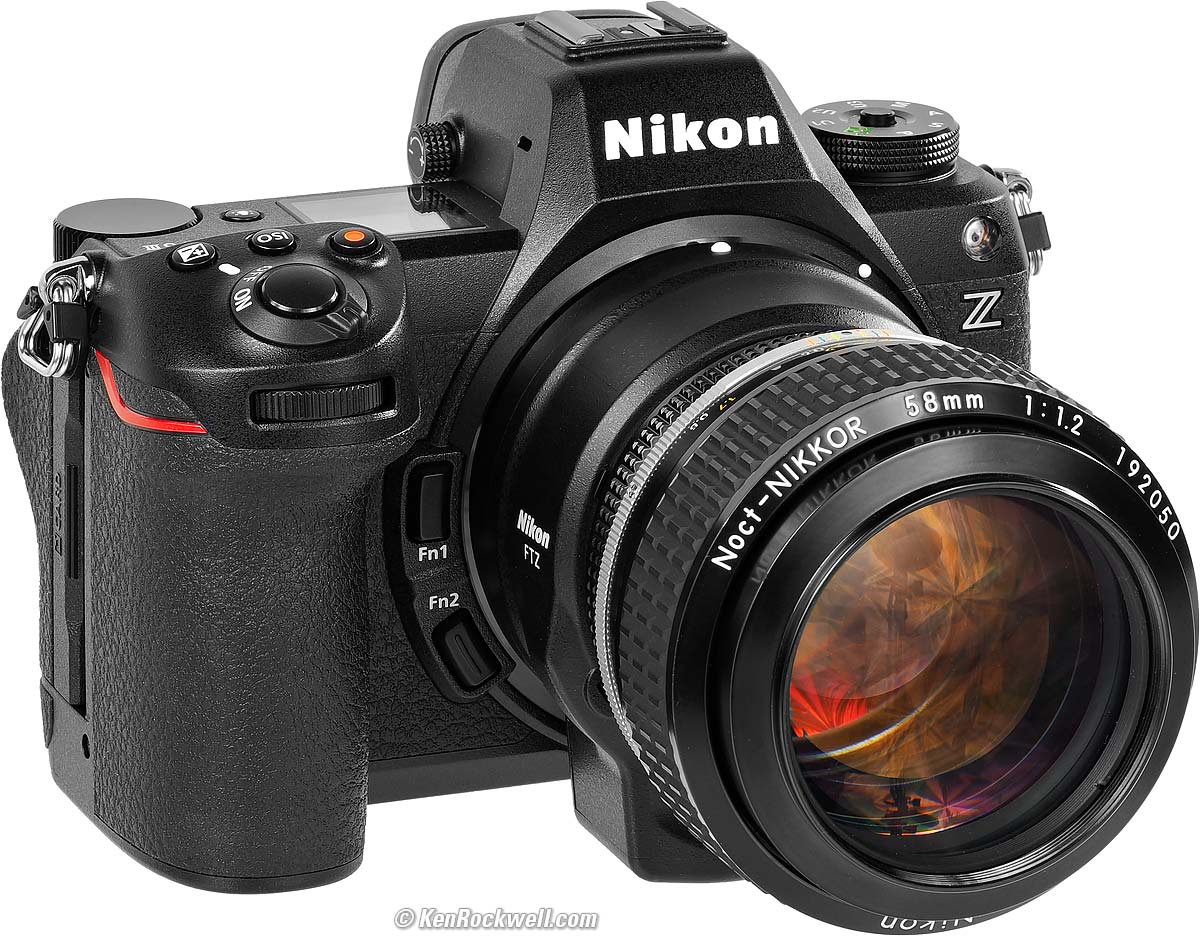
Nikon Z6 III with Noct-NIKKOR 58mm f/1.2 on an FTZ. bigger. I got mine at B&H. I'd also get it at Adorama or at Crutchfield, or used at eBay (How to Win at eBay). It also comes as a kit with the Z 24-70mm f/4 at B&H, at Adorama and at Crutchfield, and used at eBay (How to Win at eBay).
This all-content, junk-free website's biggest source of support is when you use those or any of these links to approved sources when you get anything, regardless of the country in which you live. Thanks for helping me help you! Ken.
Introduction Charging Power Conservation
Autofocus Using the LCD to Select AF Areas
Monitor Control Button Finder Size
Release Displays Level Displays HLG Format
Custom Controls Lens Ring Functions Lenses
FTZ Adapter Adapted Manual Lenses
Exposure ISO Settings Bracketing
Auto Dynamic Range Picture Controls
Sharpening Auto WB Card Settings Shooting
Crop Modes Shutter Modes Shutter Sounds
Flash Studio Strobes & Flash-Only Shots
Self-Timer Grid Lines Time Exposures
Astro Night Vision Starlight View Movies
Image Review Playback Finder Brightness
Front Dial Playback Settings Voice Notes
U1, U2 & U3 My Personal Setup Files
Nikon's own Z6 III User's Guide PDF
August 2024 Nikon Mirrorless Mirrorless Lenses All Nikon Lenses Nikon Flash All Reviews

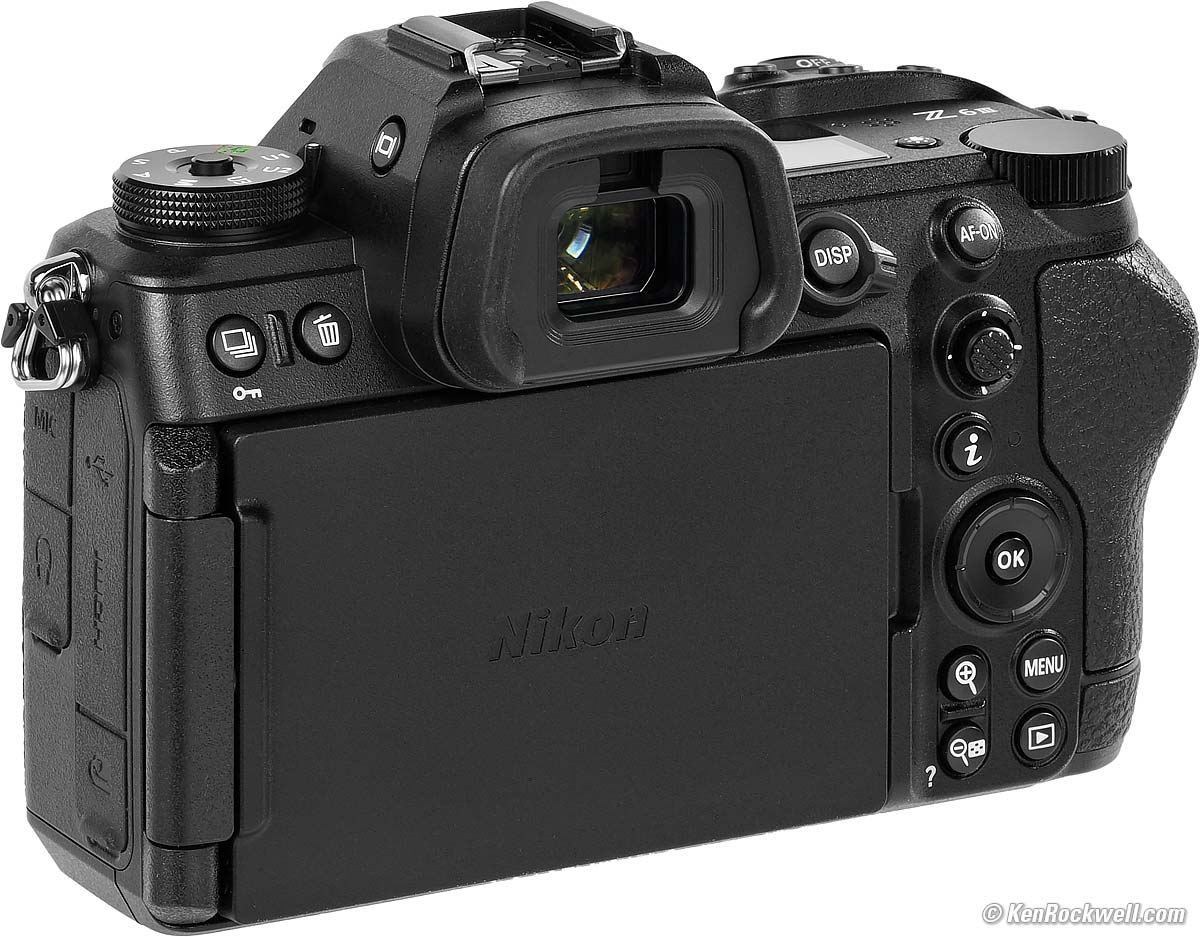
Nikon Z6 III, LCD flipped-over and protected. bigger.

Introduction index top

I buy only from these approved sources. I can't vouch for ads below. |


Here are tricks and secrets I use with my Nikon Z6 III.
This will help you get the best out of the Z6 III's features and operate the camera, but this has nothing to do with making great pictures. See How to Take Great Pictures to learn that.
Most of these settings can be made many ways; the menu system is usually the easiest to describe here, and often you can assign Custom Controls to make these settings more quickly.
This is as of firmware C 1.00 / LF 1.10; menu locations can move around over time.
This all-content, junk-free website's biggest source of support is when you use any of these links to approved sources when you get anything, regardless of the country in which you live. Thanks for helping me help you! Ken.
If you find this page as helpful as a book you might have had to buy or a workshop you may have had to take, feel free to help me continue helping everyone.
As this page is copyrighted and formally registered, it is unlawful to make copies, especially in the form of printouts (printed copies) for personal use. If you wish to make a printout for personal use, you are granted one-time permission only if you PayPal me $5.00 per printout or part thereof. Thanks for helping me help you and keeping this all out here, free to read when you need it! Ken.
Battery Charging index top
My battery arrived stone-cold dead, almost making me think I had a dead camera since the LCD remained completely blank and the camera remained dead for the first 10 minutes of charging.
Plug the camera into any basic USB-C outlet with any generic USB-C to USB-C cable. The USB-C source can be a simple 5V, non-PD source, but it does have to be USB-C.
The Z6 III's battery is only rated 16 Wh, so you can see that you don't need a large (60W) laptop charger for this little camera — they all work equally well.
It will not charge from a USB-A source even if you use a USB-A to USB-C cable.
Once connected, it takes a few seconds for the amber CHARGE LED, hidden above the USB socket and below the strap lug, to turn on. Be patient:
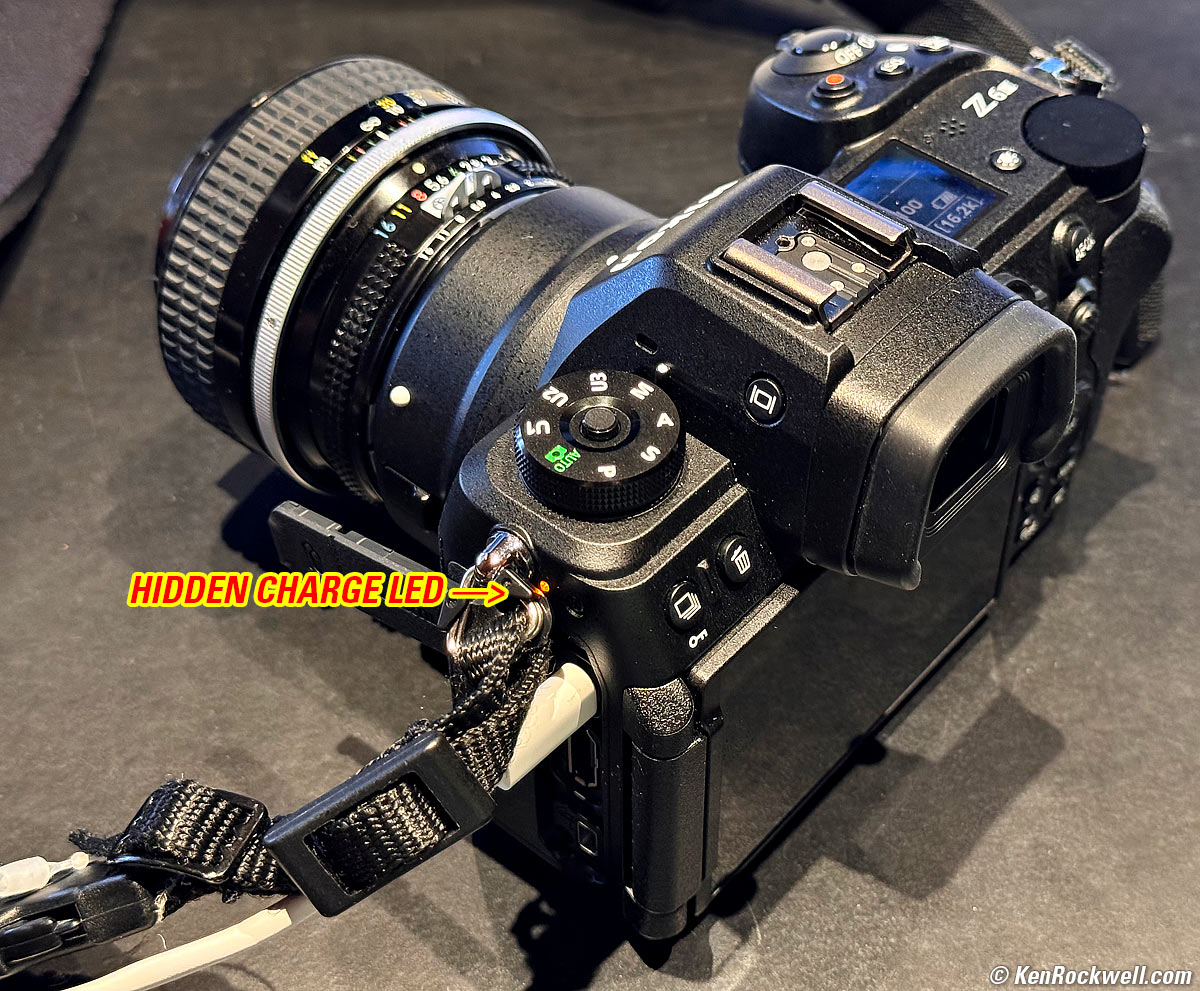
Nikon Z6 III Hidden Charge LED . bigger.
Don't be confused by the more obvious green LED on the back, which pops on — and goes off — immediately when you connect power.
It only charges when OFF or sleeping. You don't need to turn off the camera as when you walk away it will eventually go to sleep and charge, but you're not going to see the amber CHARGE LED until it does start to charge.
The amber CHARGE LED goes out when done charging.
Oddly a battery icon shows on the the top LCD while charging, but doesn't update until you wake the camera again, making it useless for monitoring charging!
The newest included EN-EL15c and older EN-EL15b batteries charge in-camera via USB. The older EN-EL15 and EN-EL15a batteries work fine for shooting, but you'll have to charge them in the external charger. Watch carefully: if you try to charge the older EN-EL15 or EN-EL15a batteries in-camera you'll see a rapidly blinking amber CHARGE LED telling you that they are not charging.
You can charge the batteries inside the MB-N14 dual battery charging vertical grip.
You can use an optional MH-25a external battery charger (rated about 2½ hour charge time), but I'd only bother if I had two batteries to charge at once (one in-camera via USB and one in the external charger):
|
|
Nikon MH-25a charger. enlarge. |
Nikon MH-25a charger. enlarge. |
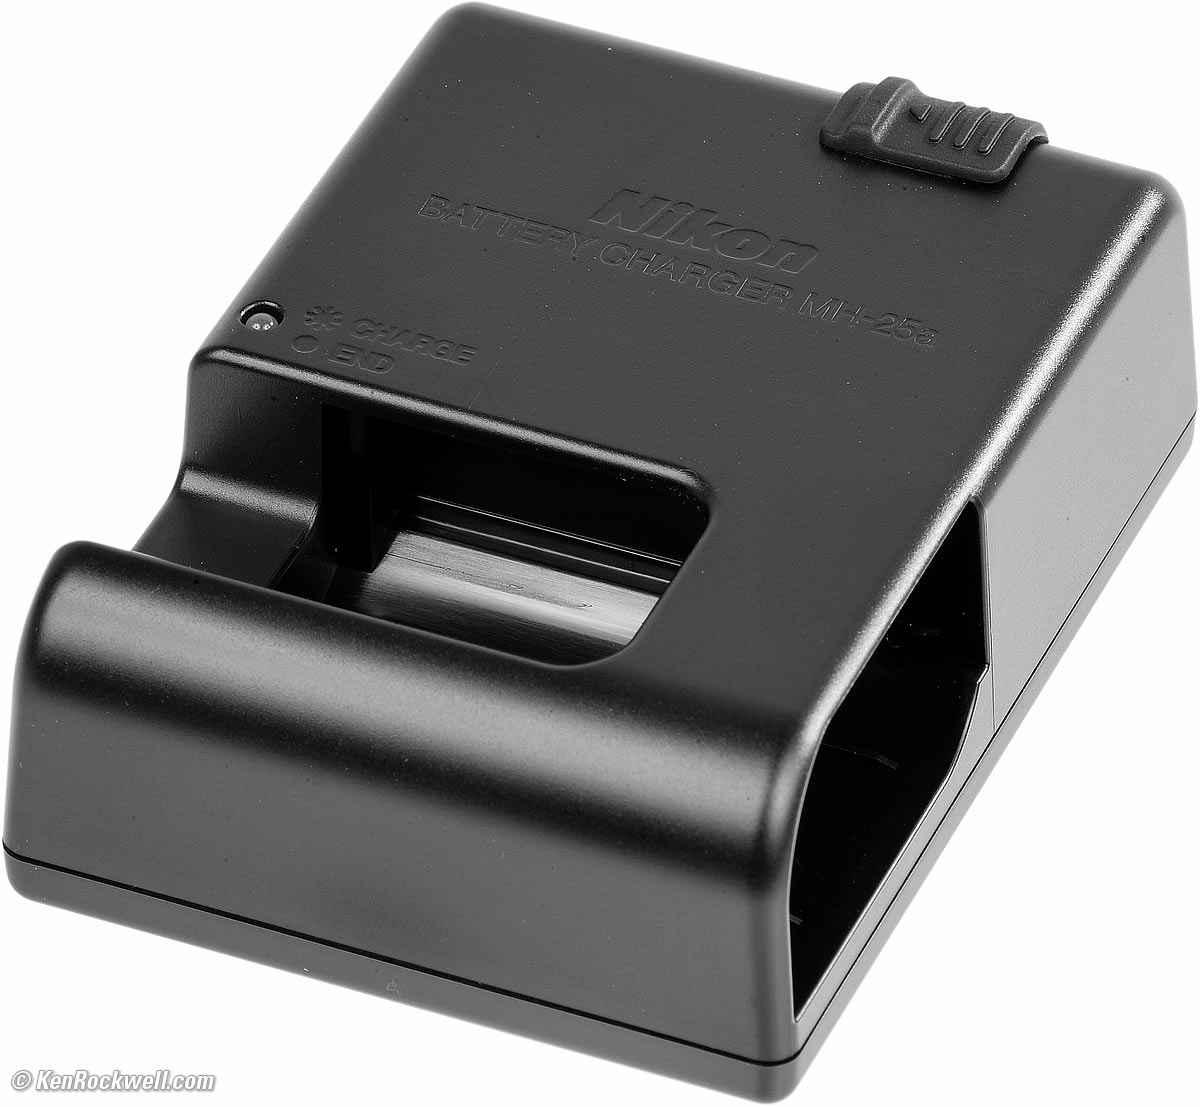
The MH-25a external charger has been used for years. It has a bizarre flipping socket which requires either the bizarre and awkward short US plug (often included but not shown above), or a standard "figure-8" power cord. The optional charger is clumsy, requires you slip the battery into the hole instead of popping it in from the top like most good chargers, and is useless unless you also bring a cord or plug with you traveling.
The MH-25a charge LED blinks slowly while charging and goes solid when done. There is no indication of charge percentage while charging.
Power Conservation index top
You can leave your Z6 III ON and it's always ready to shoot with a second's notice. It goes to sleep and wakes automatically. Of course it does take a second to wake up so you need to remember to tap the shutter as you're bringing the camera to your eye, and otherwise it sleeps properly as you carry it around all day shooting.
It often takes phantom pictures of your feet when hung around your neck because touching the rear LCD often takes a picture! To stop this, which also keeps the Z6 III awake and running down your battery, look at the rear LCD and tap the icon towards the lower left showing a finger on a screen until it says OFF. The Touch Shutter/Touch AF setting is the one that takes pictures by itself.
Autofocus Settings index top
Set the AF system using whatever Fn or other button you've assigned to Focus Mode (I set my Fn2 to this), and the Focus Mode is usually an option at the rear 𝒊 button.
Some people spend years learning how to twiddle with the Z6 III's innumerable AF system settings.
I don't.
I only use a few settings, and disable all the others so they don't get in the way of me setting the few I do use.
I go to
MENU > ✎ (pencil icon) CUSTOM SETTINGS MENU > a Focus > a8 Limit AF-area mode selection > and I uncheck everything except Single-point AF, 3D-tracking and Auto-area AF.
Now when I set my AF Area mode, I only have to click through the two or three modes I actually use.
I use AF-S (Single) for things not moving. It focuses and locks. If things are moving I use AF-C (continuous), which continues to track focus in and out. Easy!
I usually use the All-Area AF-Area mode[▆] , in which just figures out which area(s) to use, and just locks in AF-S or tracks in AF-C. Easy.
Only if my Z6 III can't find the subject, I'll use the Single Area or 3D AF-area mode [3D] and put the AF area where I need it. Focus locks in AF-S, and it tracks and moves all over the frame in AF-C.
Hint: Rather than moving a single sensor with the clicker in single-AF-area mode [□] , use the 3D AF-area mode [3D], point the camera so the center sensor is on the subject, then recompose in AF-C [3D] and the sensor will move itself to stay on the subject as you recompose! Hand-held it's much easier to move the camera than to move the sensor.
Hint: See Priority Settings (below) if you actually want your action shots to be focus.
Hint: See Getting Green for GO (below) to have AF sensors show in green, rather than red, when they're in focus.
Use the Touch Screen to Select AF Areas index top
Hint: Much better than using the old clicker or thumb nubbin to select AF points, we can use the rear LCD as a continuous touchpad to select AF areas as we look through the finder!
This is a huge improvement over having to click a clicker; now just slide your finger to move the area. To set this, set:
MENU > ✎ (pencil icon) CUSTOM SETTINGS MENU > f Controls > f4 Touch Fn > Enable/disable touch fn > ON.
This activates the touch screen.
Now set:
MENU > ✎ (pencil icon) CUSTOM SETTINGS MENU > f Controls > f4 Touch Fn > Assign touch fn > [□] Move focus point.
This lets us move focus points by sliding a finger on the LCD, while we're using the finder!
and set:
MENU > ✎ (pencil icon) CUSTOM SETTINGS MENU > f Controls > f4 Touch Fn > Touch fn area > "Wide" orientation > Right half .
Set this to taste. "Right half" means you don't have to stick your finger in your eye to move the AF sensor to the left side of the screen.
and:
MENU > ✎ (pencil icon) CUSTOM SETTINGS MENU > f Controls > f4 Touch Fn > Touch fn area > "Tall" orientation > Entire screen.
Set this to taste. This lets you use the whole screen when shooting vertically.
Getting Green for GO! index top
In 2018 Nikon paradoxically chose to make in-focus AF areas in AF-C (continuous AF) mode show in red, which means stop, rather than in green which means GO!
To fix this, set:
MENU > ✎ (pencil icon) CUSTOM SETTINGS MENU > a Focus > a10 Focus point display > AF-C in-focus display > ON.
Focus and Release Priority Settings index top
These are settings to select whether you prefer the Z6 III to shoot at maximum speed, regardless of if it's in focus, or slow down as needed and only shoot in-focus pictures.
You're probably asking why anyone would want out-of-focus pictures, and I agree, these modes are mostly to make the cameras seem like they run fast for sales demos, or maybe for news gathering where you want to have the option to delete hundreds of soft photos later just in case one catches something really important.
Nikon calls these settings Autofocus Priorities.
FOCUS priority means it only shoots in-focus pictures, but it will shoot more slowly, not shooting if it's not in focus.
RELEASE priority just shoots without regard to if anything's in focus.
A good option I use for AF-C is RELEASE + FOCUS priority, which is a mix between the two extremes.
There are separate settings for AF-S (autofocus and lock) and AF-C (continuous tracking autofocus) modes
Set these at:
MENU > CUSTOM SETTING MENU (✎ pencil icon) > a Autofocus > a1 AF-C priority selection, and at:
MENU > CUSTOM SETTING MENU (✎ pencil icon) > a Autofocus > a2 AF-S priority selection.
Rear-Button Autofocus index top
If you want to press a rear button to activate autofocus, rather than having it autofocus whenever you've half-pressed the shutter button, first deactivate the shutter button from autofocusing:
MENU > CUSTOM SETTING MENU (✎ pencil icon) > a Autofocus > a6 AF activation > AF-ON only > OK.
By default AF-ON is assigned to the top right rear AF-ON button, and if you want to program it to a different button:
MENU > CUSTOM SETTING MENU (✎ pencil icon) > f Controls > f2 Custom controls (shooting) > (select a button) > OK > choose AF-ON > OK.
You can assign AF-ON to more than one button at a time, so you can tap either for one-touch AF.
Monitor Control Button on Finder Hump index top
The Z6 III has automatic EVF/LCD switching, so what does the little button on the back left side of the finder hump do?
It lets you shut off the rear LCD to save batteries or be less noticeable while shooting in the dark. Press it and the finder only turns on when your eye is on it. Keep tapping it to swap among the various modes.
Finder Size index top
A "Finder display size" option lets you reduce the size of the Live View image to allow theZ6 III to be held farther away and still allow the complete live image to be visible through the finder. Set this at
MENU > 🔧 SETUP > Viewfinder display size > SMALL if you prefer.
I leave it at STANDARD, but I don't wear glasses.
The menu display has always been reduced in the finder but full-size on the rear LCD; this option doesn't change the menu or playback image size, just the Live View image in the finder.
Finder Release Displays index top
Selectable finder modes let you choose how the camera lets you know it shot: either nothing, lines around the frame, lines at just the left and right sides or the frame blacks-out.
Select this at
MENU > ✎ (pencil icon) CUSTOM SETTINGS MENU > d Shooting/display > d15 > Release timing indicator:
TYPE A blacks-out the frame when it shoots, like a DSLR.
TYPE B blinks lines along all four sides of the finder frame. They are both black and white so you can see them regardless of the picture you're taking. I use this mode.
TYPE C blinks lines only at the left and right sides of the frame.
OFF does nothing as it shoots.
I prefer TYPE B, but sadly these only take effect at H+ (20 FPS) and above. At H (16 FPS) it's a fast road to insanity with the finder blacking out at 16 FPS!
Level Display Options index top
To show the level display, hit the rear DISP button until it appears.
There are two different kinds of level display.
Type A is the usual aircraft-style artificial horizon lines, and TYPE B are two little bars along the bottom and right side.
Select these at
MENU > ✎ (pencil icon) CUSTOM SETTINGS MENU> d Shooting/display > d18 > Virtual horizon type.
HLG Still Image Format index top
You can select this at
MENU > 📷 PHOTO SHOOTING MENU (camera icon)> Tone mode.
CAUTION: by all means try this format if you like, but:
1.) Before shooting anything important, be sure your software can read these files. I kid you not; it's not uncommon for some people to shoot a job or special vacation trip for which they bought this new camera in RAW or HLG or some other new format only to discover after the shoot is done that they have no way of reading the files, and
2.) Before you save edited images or try to deliver original images to your client or try to post them, first be sure that wherever or to whomever you are planning to send them likewise can use or read the file type.
I have never used this format for exactly these reasons. I use SDR and JPG.
Programing Custom Fn Buttons, Rings & Controls index top

We can reprogram many of the Fn and other buttons, dials and controls do. This is also where we program lens control rings.
Assign these at MENU > CUSTOM SETTINGS MENU (✎ pencil icon) > f Controls > f2 and f3 Custom control (shooting and playback).
I set my Fn1 button to AF-Mode and my Fn2 button to (Depth of Field) Preview, and you may do whatever you like.
Lens Ring Functions index top
Normally the lens' big focus ring is a manual focus ring, however you can reset it at:
MENU > CUSTOM SETTINGS MENU (✎ pencil icon) > f Controls > f2 Custom controls (shooting) > click down or up to Lens Fn Ring > and chose what you want it to do.
Lenses index top
The Z6 III uses Nikon's Z-mount mirrorless lenses.
I use the Z 24-200mm for everything.
I don't like the limited range of 24-70mm or 70-200mm lenses. I don't need the f/4 or f/2.8 speed, and I LOVE having both ranges in ONE lens, the Z 24-200mm. Look at my Sample Images; of course the Z 24-200mm is sharp.
I use the Z 100-400mm or Z 180-600mm if I need a much longer telephoto.
I prefer the Z 14-30mm if I need an ultrawide (see How to Use Ultrawide Lenses).
Use the FTZ or FTZ II adapter for your older Nikon AF DSLR or manual-focus 35mm camera lenses, for instance the excellent 28-300mm VR or the 16-35mm VR if you already own them.
Use the FTZ or FTZ II adapters only with Nikon's newest lenses with a built-in AF motor (AF-S and AF-P). These are the only lenses that autofocus with this adapter.
Don't get the FTZ or FTZ II for use with traditional AF-D, AF or manual-focus lenses. Traditional AF-D and AF lenses do not autofocus on the FTZ or FTZ II. Nikon still sells many of these lenses new today, and they work much better on any FX DSLR like a D750. Poo!
Manual-focus F, AI , AI'd, AI-s and adapted rangefinder lenses work poorly on the FTZ or FTZ II, with no automatic diaphragm control, poor exposure control, poor finder brightness control and no EXIF or in-finder aperture data — and you have to open-and-close the diaphragm manually for precise focus for each shot!
The Fringer EF-NZ Adapter adapts Canon EF lenses with often better results on my Nikon Z cameras than Nikon's own lenses give on the crappy FTZ adapter! It should also work with other lens brands in Canon EF mount, adapting them to Nikon Z.
FTZ II & FTZ adapters top
Nikon Noct-NIKKOR 58mm f/1.2 on an FTZ on a Nikon Z6 III. bigger.
I have an entire page on what works and doesn't work with Nikon's FTZ adapters, which lets Nikon's F-Mount lenses mount on a Z camera.
In short, all the newest AF-I, AF-S and AF-P lenses work fine with Nikon's FTZ adapter, while there is no autofocus with any other lenses, and especially no autofocus with older AF and AF‑D lenses, many of which Nikon still sells new today.
Manual-Focus F, AI converted, AI and AI‑s don't work very well, with no communication or control of aperture. Manual-focus lenses work much better on any FX DSLR than on the FTZ.
See all the details at Nikon FTZ & FTZ II Compatibility & Review.
Adapted Rangefinder & Manual-Focus Lenses top
Nikon Z7 with W-NIKKOR•C 3.5cm f/1.8 (1956~1964). bigger.
You don't need and can't use the FTZ Adapter with rangefinder lenses. These lenses have to get closer to the sensor, and are the original mirrorless lenses. This is good, because we can get basic adapters cheap direct from China over eBay for just about any kind of lens.
In fact, we now can use even Nikon's original 1940s-1960s rangefinder lenses on the Z6!
LEICA's lenses for the LEICA M3 with goggles work great, too!
See Use with Adapted Rangefinder Lenses for more.
Palms and Storm, 6:21 PM, 29 November 2018. 2018 Nikon Z7 with 1956 W-NIKKOR•C 3.5cm f/1.8 (see Adapting Rangefinder Lenses to Nikon Mirrorless), f/4 at 10 seconds at ISO 64, shown exactly as shot. bigger or camera-original © file. The palm tree is blowing all over in the wind; don't expect it to be museum-sharp.
Exposure index top
Leave metering set to MATRIX.
Press the rear 𝒊 button and choose the correct box to set this. It should be at Matrix unless someone changed it.
Matrix often gets everything right, and if your images are too dark or light, press the top +/- (exposure compensation) button, click the rear dial left or right a click or two and you should be able to get perfect exposures.
Exposure, even in Matrix mode, is very dependant on which AF sensors are active and what they're seeing, therefore exposure can vary greatly as I recompose, which is annoying. I wish it wouldn't do that. Worse, the brilliantly bright finder gets so bright in daylight or shooting sunsets that it's hard to judge exposure without stopping to play back and look at the histograms. Since the finder brightness varies over such a wide range it's hard to tell the difference between image exposure and finder brightness.
Today's Matrix Meter is worse than it was back when it was invented over 40 years ago because it's no longer smart enough to make bright sand, snow or clouds in direct sunlight look like light sand, snow or clouds. Today's meter is no longer smart enough to recognize absolute brightness levels, and thus underexposes bright things as medium gray.
The Center-weighted and Spot modes are old static modes from the 1970s. They require we know and apply the Zone System, which means adding or subtracting a stop or two depending on the subject when it fills the metering area:
White: +2 stops.
Light Gray, granite rocks or Caucasian skin (palm of the hand): +1 Stop. (Bright yellow: +2/3 stop.)
Medium Gray (North sky, green grass): Zero.
Dark Gray, medium red barn wood: -1 Stop.
Very Dark Gray (shadows): -2 Stops.
Black: -3 stops.
The Matrix meter in my Z6 III varies so greatly depending on composition, and since it's no longer smart enough to render bright objects brightly, I may try Center Weighted again, but you have to know and apply the Zone System for subjects that are lighter or darker. This may or may not be faster than trying to figure out what Matrix is doing each time.
The Highlight priority mode claims to protect highlights from overexposing, but can lead to overly dark images that need to be cleverly lightened with software like Radiant Photo later for optimum results.
Setting ISO in Full Stops index top
Except for when Auto ISO selects them, I have no need for fractional ISOs like 125 or 8,000. I don't want to have to make three times as many clicks to skip past the fractions.
Therefore I set (manual) ISOs to set in full stops at
MENU > ✎ (pencil icon) CUSTOM SETTINGS MENU > b Metering/exposure > b1 ISO sensitivity step value > 1 step.
Setting this to FULL STOPS only effects manual settings; AUTO ISO still sets itself in what looks like sixths of a stop.
Set to FULL STOPS I can get from ISO 100 to ISO 6,400 in just 6 clicks of the dial rather than 18!
Bracketing index top
There's no BKT button, unless you program one of your function buttons to this.
Turn on bracketing at MENU > PHOTO SHOOTING MENU (📷 camera icon) > Auto bracketing > and then click right to turn bracketing ON and OFF.
Choose what you want to bracket at MENU > PHOTO SHOOTING MENU (📷 camera icon) > Auto bracketing > Auto bracketing set.
Among the choices are Exposure (total, flash or ambient), White Balance or Adaptive Dynamic Range bracketing.
Automatic Dynamic Range Optimization index top
Nikon has a magic image optimizer called "Adaptive D-Lighting" that does its best to ensure that everything from highlights to shadows and everything in between always looks great. I always use this feature.
For some reason it's OFF by default in my Z6 III, so I activate it at:
MENU > 📷 PHOTO SHOOTING MENU (camera icon) > Active D-Lighting > Auto.
The Auto position does its best every time; I've never used any of the manual settings like Normal or High ever since Nikon added the AUTO setting.
Picture Controls index top
This is where we set the look of our images. Photography is art; set these wherever you like to get the look you want. Set these at:
MENU > 📷 PHOTO SHOOTING MENU (camera icon) > Set Picture Control.
For people pictures I use STANDARD. Setting insane levels of saturation makes people's skin look bad, and once I've made this mistake, I can't fix it by dropping saturation in Photoshop. Be very careful about amping-up saturation with people.
Personally I love insanely colorful images if people aren't involved, so I find colorful things and leave this set to VIVID — and I also peg saturation at +3.
I also usually set Sharpening very high, often to 9, but never play with anything else. I don't touch Mid-range sharpening (left at +2.00), Clarity (left at +1.00) or Hue (0.00); these can look ugly if set away from their defaults.
The same Picture Control applies in Movie or Still mode, while B&W mode selects only the monochrome Picture Control modes.
Sharpening Settings index top
Sharpening is set at Picture Controls, at MENU > PHOTO SHOOTING MENU (📷 camera icon) > Set Picture Control > (select your choice of picture control) and click right.
Now you'll see four choices:
Quick sharp: I don't touch this; this is a one-stop way to adjust all of the settings below with one control. I leave this at 0.
Sharpening: I usually peg this at +9.
Mid-range sharpening: Leave this at its default of +2.
"Mid-range" means an unsharp mask with a very large radius. In English, it means it's sharpening coarse details, not the usual fine details we expect.
If you set it too high it increases overall contrast in nasty ways that put dark shadows under people's eyes, puts white halos around things and make things look generally cruddy. For instance:

Desert Palms, 9:27 AM, 18 November 2018. Nikon Z7 w/FTZ, Nikon 500mm f/5.6 E PF, f/5.6 at 1/400 hand-held. bigger, full resolution or camera-original © JPG file.
This shot looks ugly as I had the Z6's midrange sharpening set to +5, which is way too much because it overemphasizes some contrasts in nasty ways.
Experiment with this one, but go easy on it until you master it.
Clarity: I leave this at its default of +1.
Auto White Balance index top
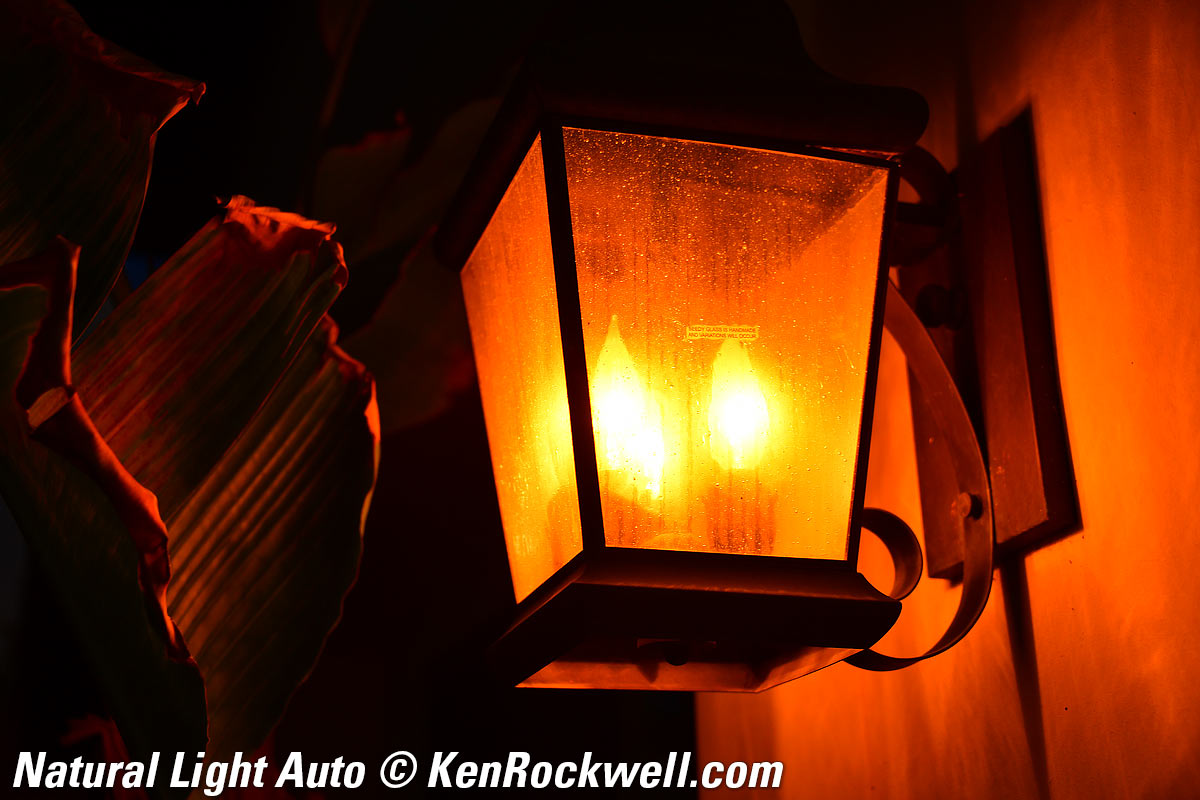
There are four manually-selected Auto White Balance modes: AUTO0, AUTO1, AUTO2 and AUTO☀ (Natural Light Auto), which doesn't exactly seem automatic. The good news is that when you select the correct AUTO WB mode for conditions, it works really well.
You select these depending on the light under which you're shooting.
I use AUTO1, unless there is no artificial light in the image and the sun and nature (clouds, shade etc.) is the only light source, in which case AUTO☀ (Natural Light Auto) is the best choice.
We set these at
MENU > 📷 PHOTO SHOOTING MENU (camera icon) > White balance or with the 𝒊 button.
With the 𝒊 button use the rear dial to select between AUTO (1, 2 or 3) or ☀ AUTO, with ☀ AUTO being Natural Light Auto. Use the front dial to select among 1, 2, or 3 if you select AUTO (1, 2 or 3). It's easier to do than to explain here.
These all look the same in daylight and under most conditions. They vary in what they do under tungsten, sunsets, with green or yellow subjects or under fluorescent light.
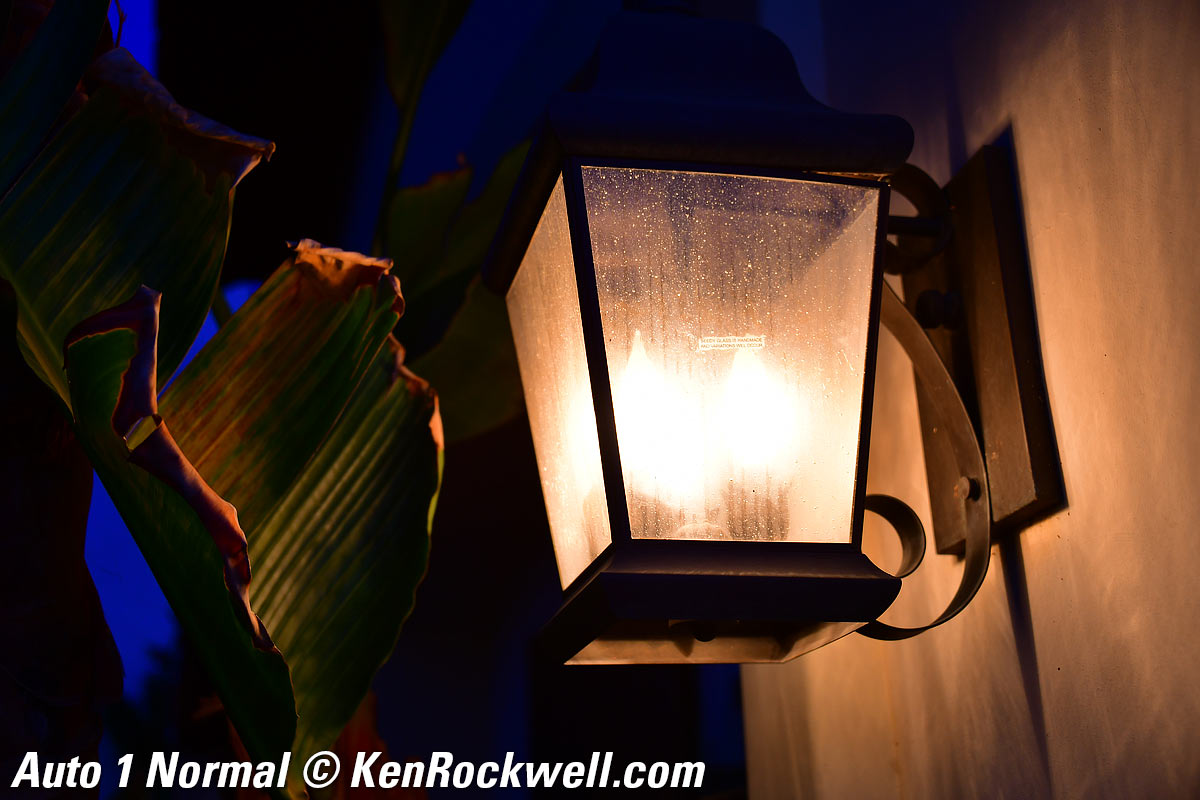
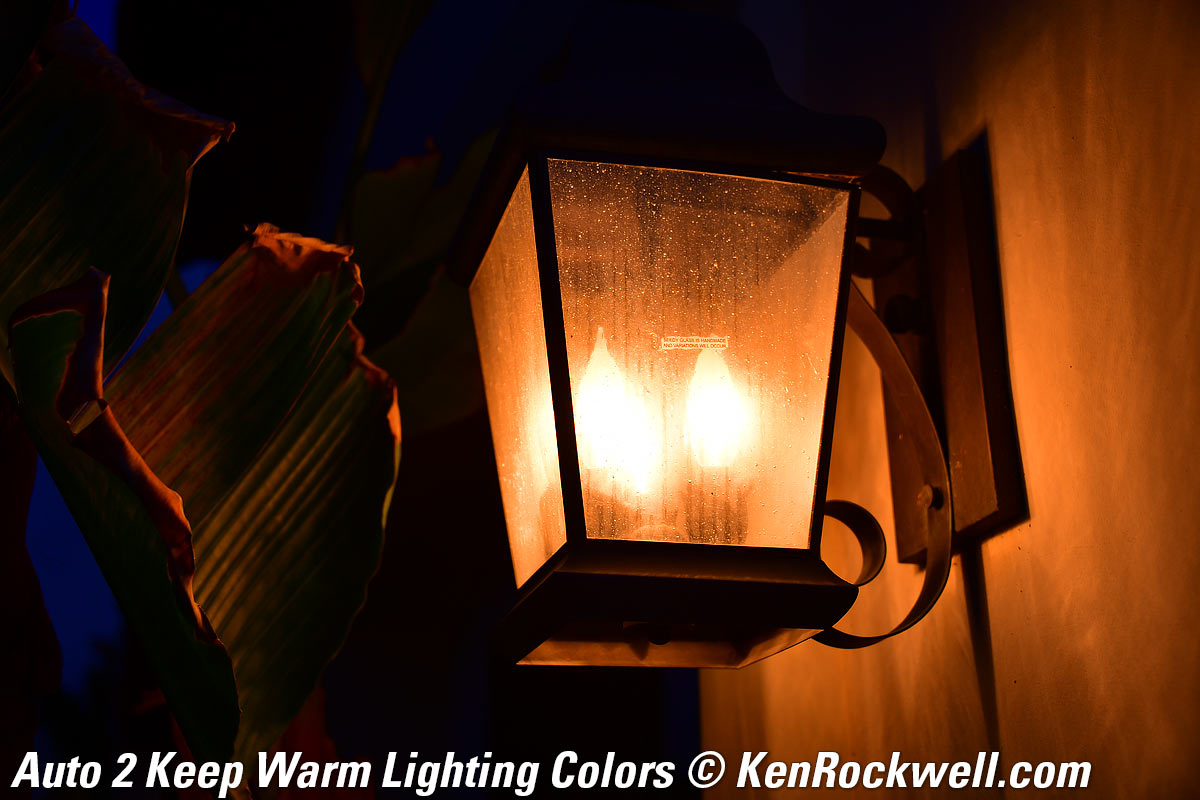
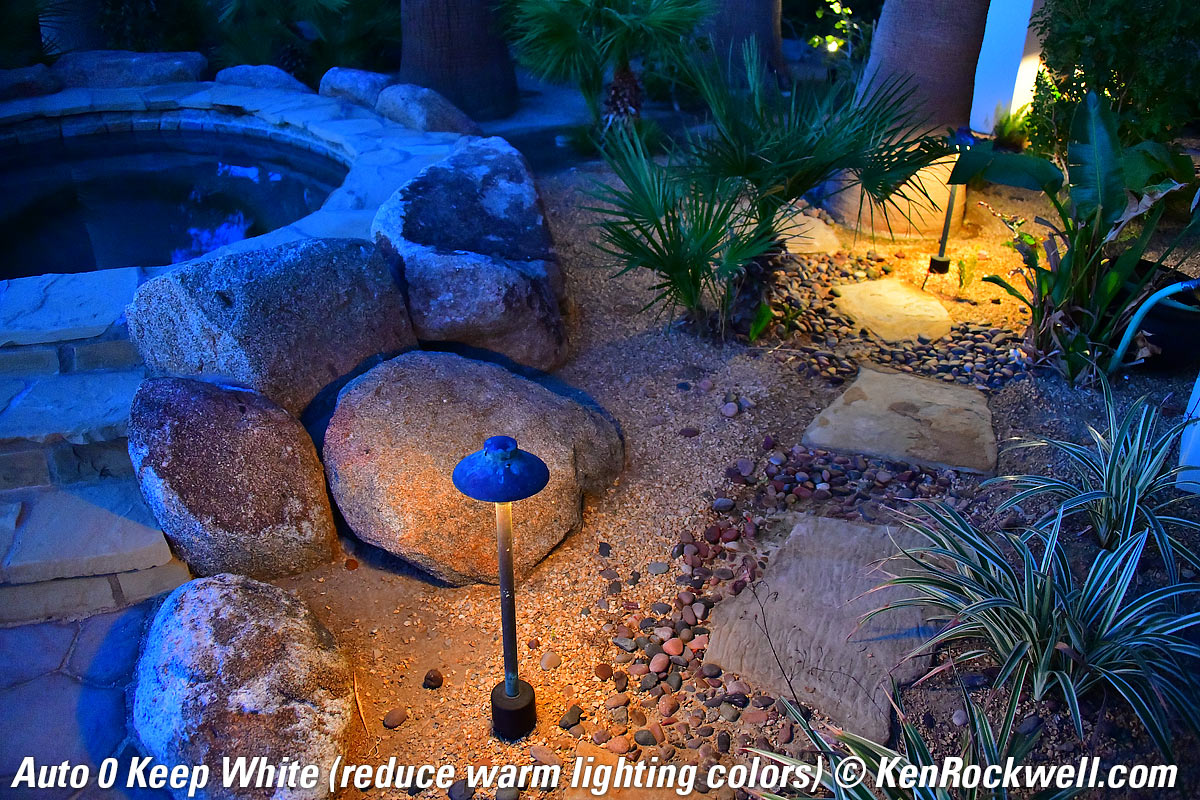
The AUTO0, AUTO1 and AUTO2 settings differ only in how low they will allow the camera's Kelvin color temperature compensation to drop to compensate for tungsten light. Regular AUTO lets the camera correct from a maximum of about 7,500 K and as low as about 1,500 K in AUTO0 Keep White, about 2,700 K in AUTO1 Normal and about 4,000 K in AUTO2 Keep Warm. In any of the AUTO0, AUTO1 or AUTO2 settings the camera will vary all over the green/magenta axis as needed.
The AUTO0 "keep white" setting allows the camera to correct more fully under tungsten light to let indoor shots look whiter (less orange).
The AUTO2 "keep warm lighting colors" limits the camera's ability to correct for tungsten light, leaving indoor shots looking warmer (more orange).
Which of these three you prefer depends on how warm you want indoor shots to look. Most people and I prefer the default AUTO1 setting.
The Natural Light Auto setting is specifically for shooting under natural light, which means light from the sun either directly, under clouds or shade, or indoors lit from a window without other interior lights. The Natural Light Auto setting can look better (warmer) in shade or indoors by window light, and also prevents the camera from confusing green subjects or plants in shade with fluorescent light so these shots stay green instead of turning too purple. It also prevents shots with pale yellows or oranges from being presumed to be under tungsten and made to look too blue. It allows the camera to correct from about 10,000 K to 5,000 K on the amber/blue axis, and doesn't let it vary much on the green/magenta axis.
Use regular AUTO1 most of the time, especially under artificial light, and consider using Natural Light Auto in under natural light. (Invention disclosure, Friday, 20 October 2017, 2:15PM PDT: Ideally there should be an Auto Auto White Balance setting that figures out which Auto WB setting to use all by itself. A white balance system also should look for flickering light, and if it sees it, presume that it's artificial light and set itself accordingly — but if not flickering, know that it could be any kind of lighting.)
Dimmed Tungsten Auto WB top
Click any to enlarge:
|
|
 |
 |
This was not a regular tungsten light; it was a tungsten light deeply dimmed so it was about 1,500 K or less— and the AUTO0 Keep White mode still did exactly that!
The Natural Light Auto setting is expecting light from the sun, so it doesn't correct for tungsten at all and it stays very orange. Not shown here is that for sunsets, Natural Light Auto keeps sunsets and warm afternoon light looking like sunsets and afternoon light, leaving everything in its warm brilliance.
12V 20W halogen Malibu lights at dusk Auto WB top
|
|
 |
 |
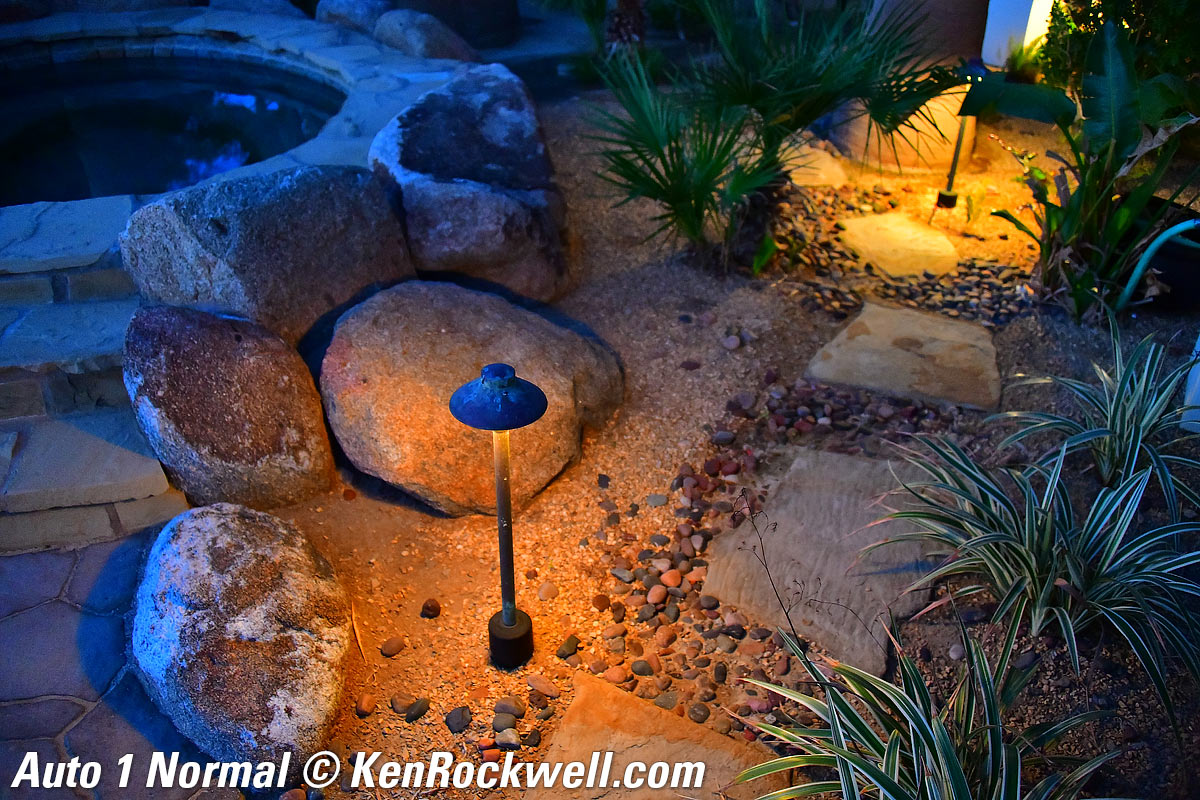
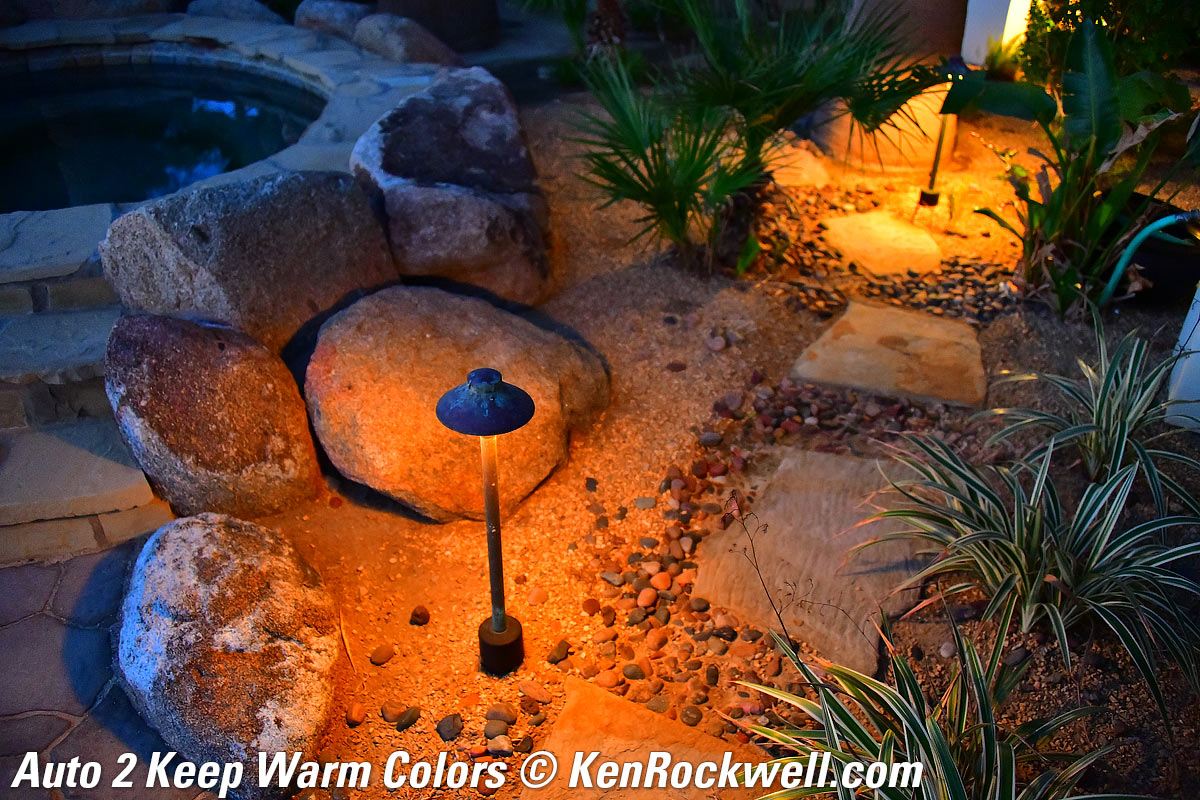
Click any to enlarge.
It's similar here, but notice how Natural Light Auto didn't make the twilight turn blue on the sandstone to the left; it left it neutral as it looked at the time.
Green Agave in Shade Auto WB top
|
|
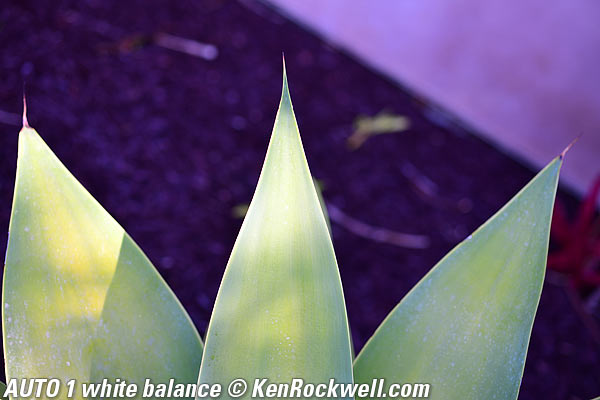

Click either to enlarge.
This is why Nikon added Natural Light Auto: green plants in shade are often confused with fluorescent lights, and the usual AWB will try to remove what it thinks is too much green, making greens duller and everything else too magenta (purple). When you set it to Natural Light Auto, it knows there isn't any fluorescent light, and lets the leaves stay as green as they should.
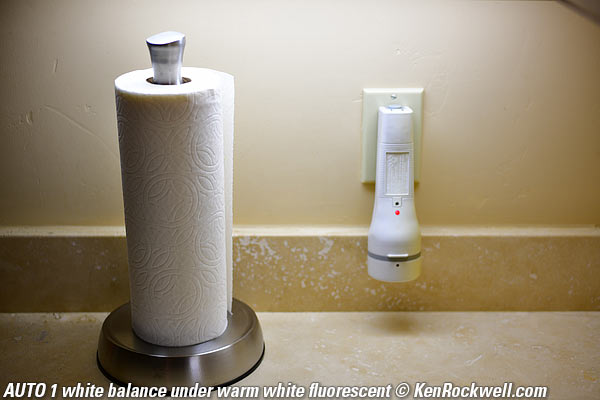
Warm White Fluorescent Auto WB top
|
|
Click either to enlarge.
In this case the AUTO1 setting expertly renders the subject naturally, while the Natural Light Auto setting is powerless to try to correct the fluorescent light.
Card Settings index top
I prefer to record the same thing to both cards at once, for backup. Set this at:
MENU > 📷 PHOTO SHOOTING MENU (camera icon) > Secondary slot function > Backup.
Shooting index top
HINT: The Z6 III can take a second to turn on or wake from sleep, which can seem like a long time if you wait to wake it until you have your eye on the finder. I tap the shutter to wake Z6 III as I first start to lift it before I bring it to my eye, so it's always ready to go.
I leave everything set to automatic, which gets me the sharpest pictures the fastest. The key is I set my camera very carefully in advance to have it make all my settings exactly as I would do manually (see my Settings File below).
I don't use the AUTO position on the top dial because it locks-out many of the advanced settings I use. I set P on the top dial ("Program" or "Pro" exposure mode which selects aperture and shutter speed automatically) and leave everything else in auto: Auto Focus, Automatic AF Area selection, Auto ISO, Auto White Balance, Auto minimum shutter speed in Auto ISO, etc. I do this because I've taken the time to program my camera to set all these as I would do manually so I can concentrate on my picture and not my camera while I'm shooting. My camera can make all the ISO and exposure and focus adjustments faster than I can, once I've programmed the camera to do this itself.
I only take a setting off Auto if it's not doing what I want it to do in its own.
I never set a manual ISO. The only time I use manual ISO is in my studio under controlled lighting, or if I'm on a tripod when I'll set it to ISO 100.
Set your camera the way I do (see my Settings File below) and you'll always get the sharpest pictures. 99% of the time when people ask me to diagnose their soft pictures it's because they set their camera manually — and set it wrong. Amateurs too often use too high an ISO, too high a shutter speed and too small a lens aperture, and any one of these three leads to softer pictures:
1.) ISO 100 is sharpest. Each higher ISO gets softer due to noise reduction in all modern cameras.
2.) Apertures smaller than f/8 dull the image due to diffraction unless you really need more depth-of-field; and you won't need that much depth of field if you set up your shot properly. Don't use f/16 or f/22 unless you really need it.
3.) Higher shutter speeds require you use a higher ISO, which makes the image softer. 1/500 to 1/1,000 stops sports and easily freezes fast-moving water. 1/125 stops people in anything other than sports. Don't use 1/2,000 or higher unless you really, really need to or have enough light to be shooting at ISO 100 — or need to shoot at very large apertures for shallow depth of field at ISO 100 in daylight. Each time you shoot something new, try different speeds and use the slowest that still stops blur.
Shoot with the all-auto settings I use (see my Settings File below) and the Z6 III does all this all by itself with no need to change any settings from shot to shot. The only thing I'll change is the minimum shutter speed in Auto ISO, based on subject or camera motion. The Z6 III will shoot at the optimum ISO and shutter speed and aperture under every condition from daylight to moonlight for photos of things (U1), photos of people (U2) and sports (U3). Easy!
By default, it takes pictures of your feet when hung around your neck because any touching of the rear LCD takes a picture! To stop this, look at the rear LCD and tap the icon towards the lower left showing a finger on a screen until it says OFF. The Touch Shutter/Touch AF setting is the one that takes pictures by itself.
Image Crop Modes index top
It's easy to set the Z6 III to shoot square photos, which I find very useful for people shots as I never miss anything while rotating my camera between vertical and horizontal. Square shots are also great for submission to photo editors as this lets them pick whatever crop fits their layout, increasing your chances of a sale.
16:9 mode isn't very useful unless you're shooting stills to edit into video.
You set these at MENU > PHOTO SHOOTING MENU (📷 camera icon) > Chose image area.
I find this mode so helpful I assign my top red ⬤ Movie button to it for shooting (I don't shoot video with my Z6 III).
Shutter Modes index top
In addition to the regular mechanical and silent electronic shutter options there is a third "Electronic First Curtain" option at MENU > CUSTOM SETTING MENU (pencil icon) > d Shooting/display > d6 Shutter type.
This means the shutter opens silently, and makes a mechanical click when it closes. This is great for eliminating camera shake on a tripod, and lets you know when your exposure is done.
The mechanical shutter it the usual one. Use it when shooting with flash.
The fully electronic shutter is silent, and also runs at higher frame rates and at speeds up to 1/16,000. Use it for action.
The "Auto" setting selects among these depending on what you're doing.
Shutter Sounds index top
The brilliant smart shutter sound changes with shutter speed, and at slow speeds it makes a soft click as it opens and again as it closes, just like a leaf shutter.
We musical folks we can confirm our shutter speeds by ear, and even set to volume 1 it's just right so we can hear it, but no one else does. Set this at:
MENU > 🔧 SETUP > Camera sounds > Shutter sound ON , volume 1, and TYPE A (or your choice, of course). Bravo!
Here is also where you can turn off the foolish beeps for other things.
Frame Rates for Still Images index top
Hold the top left advance mode button (the bearded rectangle) and turn the top rear control dial to select the frame rates.
Hint: The rear dial sets big changes in frame rate (self-timer, single, 3 FPS, 20 FPS, 30 FPS, 120 FPS, etc.), while the front dial can fine-tune most of those frame rates (self-timer duration, 1, 2, 3, 4, or 5 FPS, etc.).
The new smart shutter sound is brilliant. You can hear the frame rates, although everything sounds the same from about 16 FPS and up.
Standard Speeds, all with tracking AF & AE:
There's Low, High and High+, but no Medium. Go figure:
Electronic Shutter |
Electronic First Curtain |
Mechanical Shutter |
|
High + |
20 FPS |
14 FPS |
14 FPS |
High |
16 FPS |
10 FPS |
8.1 FPS |
Low |
1 ~ 7 FPS |
1 ~ 7 FPS |
1 ~ 7 FPS |
Works with flash? |
Yes, 1/60 sync |
Yes, 1/200 sync |
Yes, 1/200 sync |
These measured rates all agree with Nikon's claims, which is excellent.
I didn't see much in the way of slowing down trying to focus from frame-to-frame, but that's because it shot plenty of out-of-focus frames as things moved around, at least in Release+Focus Priority mode as explained here.
It also runs at 30, 60 and 120 FPS, but with very restricted shooting options:
Shooting at 30, 60 and 120 FPS index top
The Z6 III really rips at 30, 60 or 120 FPS with full autofocus and exposure tracking, but there are many feature restrictions explained below to allow it to run that fast. If you want to shoot raw files or use any of the other settings and features unavailable at 30, 60 or 120 FPS, no big deal; shoot at 20 FPS and you're good. 20 FPS is no slouch either, or shoot the Canon EOS R6 Mk II which has no restrictions at up to 40 FPS.
Specific Restrictions at 30, 60 & 120 FPS index 30, 60 & 120 FPS top
These settings only shoot at JPG LARGE NORMAL. You can't shoot raw or any other image size or JPG compression level or format.
All the autofocus settings work; focus tracks great at these frame rates.
You can shoot in any of the P, S, A or M exposure modes.
It works oddly in various exposure modes, for instance, P mode seems only to shoot at f/8.
You can't use Program Shift; instead use other exposure modes to select any particular aperture or shutter speed.
ISO can be set between ISO 50 (L1) and ISO 64,000; you can't use any of the pushed ISOs above ISO 64,000.
Auto ISO sort of works, except that the minimum shutter speed only seems to be set to the slowest available speed of each setting (1/60 or 1/125). Auto ISO ignores manual settings like 1/500. Use the Shutter-preferred or Manual exposure modes to select a particular shutter speed.
The battery-gauge shot counter only increments by one for each burst, even if you shoot hundreds of frames.
The EXIF shot counter increments correctly for each shot.
Picture Control settings work as always.
Flicker reduction is OFF.
You can't use flash.
You can't use exposure bracketing.
You can't make multiple exposures on the same frame; get a room and take it up on your own computer to stack frames.
You can't do HDR overlays.
You can't use the interval timer.
You can't do time-lapse video.
You can't do focus shift.
30 FPS |
60 FPS |
120 FPS |
|
Sensor Area Used |
FX (24 × 36mm) |
FX (24 × 36mm) |
DX (16 × 24mm) |
Slowest Shutter Speed |
1/60 |
1/60 |
1/125 |
Measured Burst Depth* |
Unlimited |
387 (6.5 seconds) |
735 (6⅛ seconds) |
Buffer Depth** |
225 shots** |
225 shots** |
450 shots** |
Image Size |
6,048 × 3,032 |
6,048 × 3,032 |
3,984 × 2,656 |
File Size |
6½ MB |
6½ MB |
3⅓ MB |
Data Load, full burst |
Size of card. |
2.5 GB |
2.5 GB |
* Actual burst depth observed with Sony 299 MB/s write-speed UHS-II card.
** This is the camera's hardware buffer. We get a much deeper burst depth depending on how fast it can write from this buffer to your card. At 30 FPS it can write faster than it shoots, so the depth is limited only by filing up the card.
Cards & Files index 30, 60 & 120 FPS top
A lot of data is created in these modes. Any of these modes generate about 2.5 GB of JPGs for each six seconds of burst.
Bring plenty of big cards. I made 12,000 shots shooting in only half an hour, or about 60 GB of data!
The Z6 III packs only 5,000 shots in each folder. You won't see it while shooting, but it creates a new folder after each image 4,999 and each image 9,999.
Sadly it only has four digits for file numbers, so on any typical action shoot you will have to deal with duplicate file numbers stored in different folders!
While you can combine the files from two of these folders with images 0001 to 9,999 in the same folder on your computer, you can't combine all of them into one folder if you've shot more than 10,000 images. Thus you now have to have a few folders to hold all the shots from one event, and even if you save only 1% of them, you still have the potential for a duplicate file names.
If Nikon was paying attention they'd use five or six digits in the file names rather than three fixed letters, an underscore and four digits — or just make the file names longer, but nooooo, we're stuck back in American computer conventions from the 1980s with these people.
Flash index top
Nikon has always mastered flash. For fill flash, just slide-on a flash, leave it set to TTL and shoot.
The SB-400 is the ultimate mirrorless flash. It works flawlessly with the Z6 III, even turning on and off with the Z6 III's power switch. Of course the Z6 III works with all Nikon flash introduced since about 2005. Sure you can get the newest big SB-5000 if you like, but it won't do much any differently.
Even better than it was on DSLRs, the SB-400 is tiny as you want on mirrorless, and it's powerful and recycles fast and the Z6 III balances it for fill perfectly.
The SB-400 was discontinued; no worry, you can get them on eBay for about $125 (see How to Win at eBay).
The SB-400 is much better for mirrorless than today's bigger and more expensive SB-300 and SB-500. The SB-300 is bigger, junkier, lower-powered and takes too long to recycle from it's pathetic AAA cells, and the SB-500 and SB-5000 are too darn big and cost way more for about the same performance as the tiny SB400.
Of course the Z6 III works with the larger and excellent SB-700 and SB-5000, just that they are bigger than the camera and you probably don't need all that power. The SB-400 has more than enough power and fits the camera's size better.
Studio Strobes & Flash-Only Exposures index top
By default the Z6 II shows you the effects of your exposure and picture control settings (exposure, contrast, color etc.) in the finder as you shoot. This is great, unless you're shooting with manual exposure by studio strobes or regular flash at a fast sync speed indoors where the final exposure is lit only by flash, and ambient light contributes little or nothing to the final exposure. In this case your finder image will be black because the ambient light isn't contributing anything at, say, 1/200 at f/22 indoors.
There's an easy work around: be sure to set MENU > CUSTOM SETTING MENU (✎ pencil icon) > d Shooting/display > d10 View mode (photo Lv) > Adjust for ease of viewing > Auto and you'll always see a finder image so you can focus and compose — but it won't show you your exposure or picture controls until you play back.
To put this back to normal, set it back to MENU > CUSTOM SETTING MENU (✎ pencil icon) > d Shooting/display > d10 View mode (photo Lv) > Show effects of settings > Only when flash is not used.
Self Timer index top
The Self Timer is set with the Advance Mode button on the rear top left, or with the rear 𝒊 button.
It remains active even if the power is turned off and back on; you have to deactivate it manually.
Finder & Rear LCD Grid Lines index top
These are lines that help composition and leveling.
To turn them on in the finder, set:
MENU > CUSTOM SETTING MENU (✎ pencil icon) > d Shooting/display > d20 Custom viewfinder shooting display > check the box next to the icon showing a grid option.
To turn them on for the rear LCD, set:
MENU > CUSTOM SETTING MENU (✎ pencil icon) > d Shooting/display > d19 Custom monitor shooting display > check the box next to the icon showing a grid option.
Time Exposures index top
California Desert Home, Hot 22 June 2019, 8:50-8:52 PM. Nikon Z7, Nikon 14-30mm at 14mm at f/11, 104 second time exposure, Perfectly Clear v3.7 "landscapes" mode. bigger, full-resolution or camera-original © file.
The Z6 III has timed manual exposures out to 15 minutes (900 seconds) if you enable them at MENU > CUSTOM SETTING MENU (✎ pencil icon) > d Shooting/display > d7 Extended shutter speeds (M) > ON. The top LCD counts down the time remaining in Manual mode.
For longer exposures, set TIME in manual exposure mode, one click away from the BULB setting. Easy! Press the shutter and it stays open until you press it again. Use the self-timer to start and put your hand or a hat over the lens to stop and you don't need a remote release.
The rear green LED blinks one every three seconds to let you know it's shooting in TIME mode, but not in BULB mode.
The top LCD counts-up the time in minutes and seconds in TIME and BULB exposure modes and with manual exposures longer tan 30 seconds, but sadly the backlight turns off! The finder turns off, too. Even if you hit the illuminator button, it turns off the backlight as the exposure starts.
Weirder and wasteful is that if you start a long exposure with your eye on the finder, and then remove it after the exposure starts, eye-control will turn on the rear LCD, but leave the screen black rather than show us any timers:
Rear LCD illuminated — but displaying black! bigger.
How many decades will it take Nikon to show us a timer in the dark? The Japanese wonder why camera sales are down and iPhone sales are up; iPhone timers have been legible in the dark since 2007, and of course the photo above is shot on my iPhone 15 Pro Max. Geeze!
Astronomical and Surveillance Night-Vision Preservation Mode index top
This mode makes the rear LCD and electronic finder a dim monochromatic red so it doesn't affect your ability to see in the dark. It only affects the finder and rear LCD; it doesn't affect how the pictures look.
Set this at
MENU > ✎ (pencil icon) CUSTOM SETTINGS MENU > d12 Warm display colors.
Mode 1 makes everything red, and Mode 2 lets you see images in color and just the menus are red. You can set the dimness here; note that what's ideal for use in the pitch dark will be very dim and difficult to see in typical indoor light.
Starlight View index top
The "Starlight View" option doesn't do anything to the pictures, but makes live-view shadows and dark areas look brighter which may help you see better while trying to compose in the dark.
Set this at
MENU > ✎ (pencil icon) CUSTOM SETTINGS MENU > d11 Starlight view (photo Lv) > ON.
Movies index top
To shoot movies, flip the rear DISP lever to the movie position, then press the red button near the shutter to start and stop.
Image Review index top
Set Image Review at:
MENU > [▶] PLAYBACK MENU > Picture Review.
Set it to ON and the picture pops up right after you shoot it.
Playback Finder Brightness index top
Since the finder sets its brightness mostly based on the light coming in the lens, I often point my Z6 III at the sky just before I hit the PLAY button to brighten the finder display.
Front Dial Playback Function index top
You can program what the front dial does during playback. I set mine to advance or retreat by 10 frames per click.
I set this at
MENU > ✎ (pencil icon) CUSTOM SETTINGS MENU > f3 Custom controls (playback) > Sub-command dial > OK > Frame Advance > 1, 10 or 50 frames per click, or lots of other things as well.
Voice Notes index top
You can assign the ⬤ Movie button (the ⬤ near the shutter button) or other buttons like the Advance Mode button to be a voice note recorder during playback. Set this at:
MENU > ✎ (pencil icon) CUSTOM SETTINGS MENU > f Controls > f3 Custom controls (playback) > (select the button you prefer) > Voice memo.
You can assign more than one button to duplicate this function.
Once set, hold down that button while playing an image and you can record a voice note (voice memo) as long as you keep holding the button (up to 60 seconds) to remark what or who is in your photo. This records a WAV file with the same file number as the image file, and is very handy in news and sports reporting.
To play the audio in the camera, tap that button while the image is displayed. You'll seen an [♪] (eight note) icon to let you know that an image has an associated voice note.
To delete the voice note (or to be able to record a different one), press the 🗑 TRASH button and you'll be given the option to delete just the voice note, or the voice note and image together.
Delete from Both Cards index top
Previous two-slotted Nikons have deleted photos only from the first card (as I prefer), leaving otherwise deleted photos on the second backup card in case you need them later.
If you prefer that your delete button deletes from both cards while shooting in Backup mode (I don't), set this at
MENU > [▶] PLAYBACK MENU > Delete pictures from both slots > YES.
U1, U2 & U3 index top
These are settings on the top mode dial which we may program to recall our own choices of camera settings for different conditions that we personally encounter. I use U1 for places and things, U2 for people and U3 for action, and yours will be for whatever you prefer to shoot.
You can update any of these modes by changing anything you like about them, then saving the result at MENU > SETUP (🔧 icon) > Save user settings > Save to U1, U2 or U3 > Save Settings.
If you change anything while in any of these U1, U2 or U3 modes, the Z6 III resets to however the U1, U2 or U3 preset was originally saved when you turn the camera back on, or when you select away and select U1, U2 or U3 again.
I've programmed my Z6 III U1 mode for nature, landscapes and all photos of things.
I set my U2 mode for people photos.
I use my U3 mode for sports — or maybe for manual-focus lenses, or studio strobes, or whatever else I'm doing:
U1: places & things |
U2: People |
U3: Sports |
|
| Advance Mode | L: 3 FPS |
L: 3 FPS |
H |
| Shutter Type | Auto |
Auto |
Electronic |
| Exposure Mode | P |
P |
P |
| AF | AF-S, [▆] All Areas* |
AF-C, [▆] All Areas* |
AF-C, [▆] All Areas* |
| Picture Control | VIVID |
STANDARD |
STANDARD |
| Saturation | +3 |
0 |
+1 |
| Sharpening | 9 |
9 |
9 |
| Mid-Level Sharpening | 2 (default) |
2 (default) |
2 (default) |
| ISO | AUTO |
AUTO |
AUTO |
| Auto ISO Maximum ISO | 64,000 |
64,000 |
64,000 |
| Auto ISO Minimum shutter speed | AUTO Slower -1 |
1/125 |
1/1,000 |
* I may choose a single area or 3D tracking if the [▆] All Area setting isn't finding my subjects properly.
Picture Control
I use VIVID for wild colors, and STANDARD for natural shots of people.
I don't use Nikon's AUTO Picture control, which does its best to guess what you're shooting and set itself accordingly.
Everyone has different tastes for people photos, feel free to experiment with the PORTRAIT setting if you like.
Saturation
This is set as a tweak inside any of the main picture controls.
I set +3 for the most saturated colors of places and things.
I set +1 to get slightly more colorful shots of people in the STANDARD setting. People start looking bad with too much saturation; just as often I'll leave it at 0.
Sharpening
This is set as a tweak inside any of the main picture controls.
I prefer to set mine to the maximum, but leave "mid-level sharpening" at its default.
Auto ISO Maximum ISO
This is the highest ISO speed to which the camera will set itself in Auto ISO.
ISO 64,000 looks OK if I need it.
I'd rather have a sharp but grainy shot at ISO 64,000 than one with motion blur at ISO 12,800.
Auto ISO Minimum shutter speed
This is the slowest shutter speed to which the Z6 will set itself before Auto ISO starts increasing ISO to ensure that it doesn't shoot at slower than this speed. It only shoots slower than this speed when it's shooting at the highest ISO just programmed above and the light gets even darker.
This is critical as this setting is what defines the ISO at which my Z6 III shoots, which then defines the aperture and shutter speed.
I rarely change aperture or shutter speed directly, and always change Auto ISO Minimum Shutter speed depending on my subject.
If my subject holds still, I set AUTO, which sets the minimum shutter speed to 1/focal length. The camera has VR, so I set this to Auto Slower -1, because I can hand-hold at even slower speeds. If snapping people, I set 1/125 as that keeps them sharp. If shooting sports, I set 1/1,000 as that keeps runners sharp.
Fell free to experiment; we all have different needs. Set this to the slowest you can while always getting sharp pictures.
My Personal Setup Files index top
HINT: Be sure to save your own settings first, in case you hate mine. Press MENU > SETUP (🔧 icon) > Save/Load menu settings (near the bottom of the menu, not the "Save user settings" option at the top) > Save menu settings and save the file to your computer from your card before you put my file on your card in its place.
If you'd like to set your Z6 III exactly as I set mine, simply download my personal NCSET014.BIN file (updated 01 August 2024) on your computer and copy it to the top-level of a card (don't put it in the DCIM or any other folder).
My NCSET014.BIN file won't do anything on your computer and certainly won't do anything here in your browser; we're just using your computer to get the file from my website onto a card to put in your camera.
Put the card in your Z6 III, set your Z6 III to P, S, A or M mode on the top dial, press MENU > SETUP (🔧 icon) > Save/Load menu settings (near the bottom of the menu, not the "Save user settings" option at the top) > Load settings > OK. Your Z6 III will be a carbon-copy of mine, complete with my personal contact information programmed into the EXIF data of each of your files.
Remember, this only works if the camera is in P, S, A or M mode and only if the file isn't in any folder but is in the top-level directory of the card, the same place as the DCIM and NIKON folders.
Be sure to set your own personal EXIF information in your camera if you choose to use my settings. Set these at MENU > SETUP (🔧 icon) > Image Comment and MENU > SETUP (🔧 icon) > Copyright Information, and be sure to set all of the IMAGE COMMENT, ARTIST and COPYRIGHT fields.
See also Nikon's Own Z6 III User's Guide PDF.
< — back to Nikon Z6 III Review
This all-content, junk-free website's biggest source of support is when you use those or any of these links to approved sources when you get anything, regardless of the country in which you live. Nikon does not seal its boxes in any way, so never buy at retail or any other source not on my personally approved list since you'll have no way of knowing if you're missing accessories, getting a defective, damaged, returned, non-USA, store demo or used camera. I use the stores I do because they ship from secure remote warehouses where no one gets to touch your new camera before you do. Buy only from the approved sources I use myself for the best prices, service, return policies and selection.
Thanks for helping me help you!
Ken Rockwell.
© Ken Rockwell. All rights reserved. Tous droits réservés. Alle Rechte vorbehalten. Alla rättigheter förbehållna. Toate drepturile rezervate. Ken Rockwell® is a registered trademark.
Help Me Help You
I support my growing family through this website, as crazy as it might seem.
The biggest help is when you use any of these links when you get anything. It costs you nothing, and is this site's, and thus my family's, biggest source of support. These places always have the best prices and service, which is why I've used them since before this website existed. I recommend them all personally.
If you find this page as helpful as a book you might have had to buy or a workshop you may have had to take, feel free to help me continue helping everyone.
If you've gotten your gear through one of my links or helped otherwise, you're family. It's great people like you who allow me to keep adding to this site full-time. Thanks!
If you haven't helped yet, please do, and consider helping me with a gift of $5.00.
As this page is copyrighted and formally registered, it is unlawful to make copies, especially in the form of printouts for personal use. If you wish to make a printout for personal use, you are granted one-time permission only if you PayPal me $5.00 per printout or part thereof. Thank you!
Thanks for reading!
Ken Rockwell.