Apple Watch ULTRA 3 User's Guide
<— Apple Watch ULTRA 3 Review
|
|
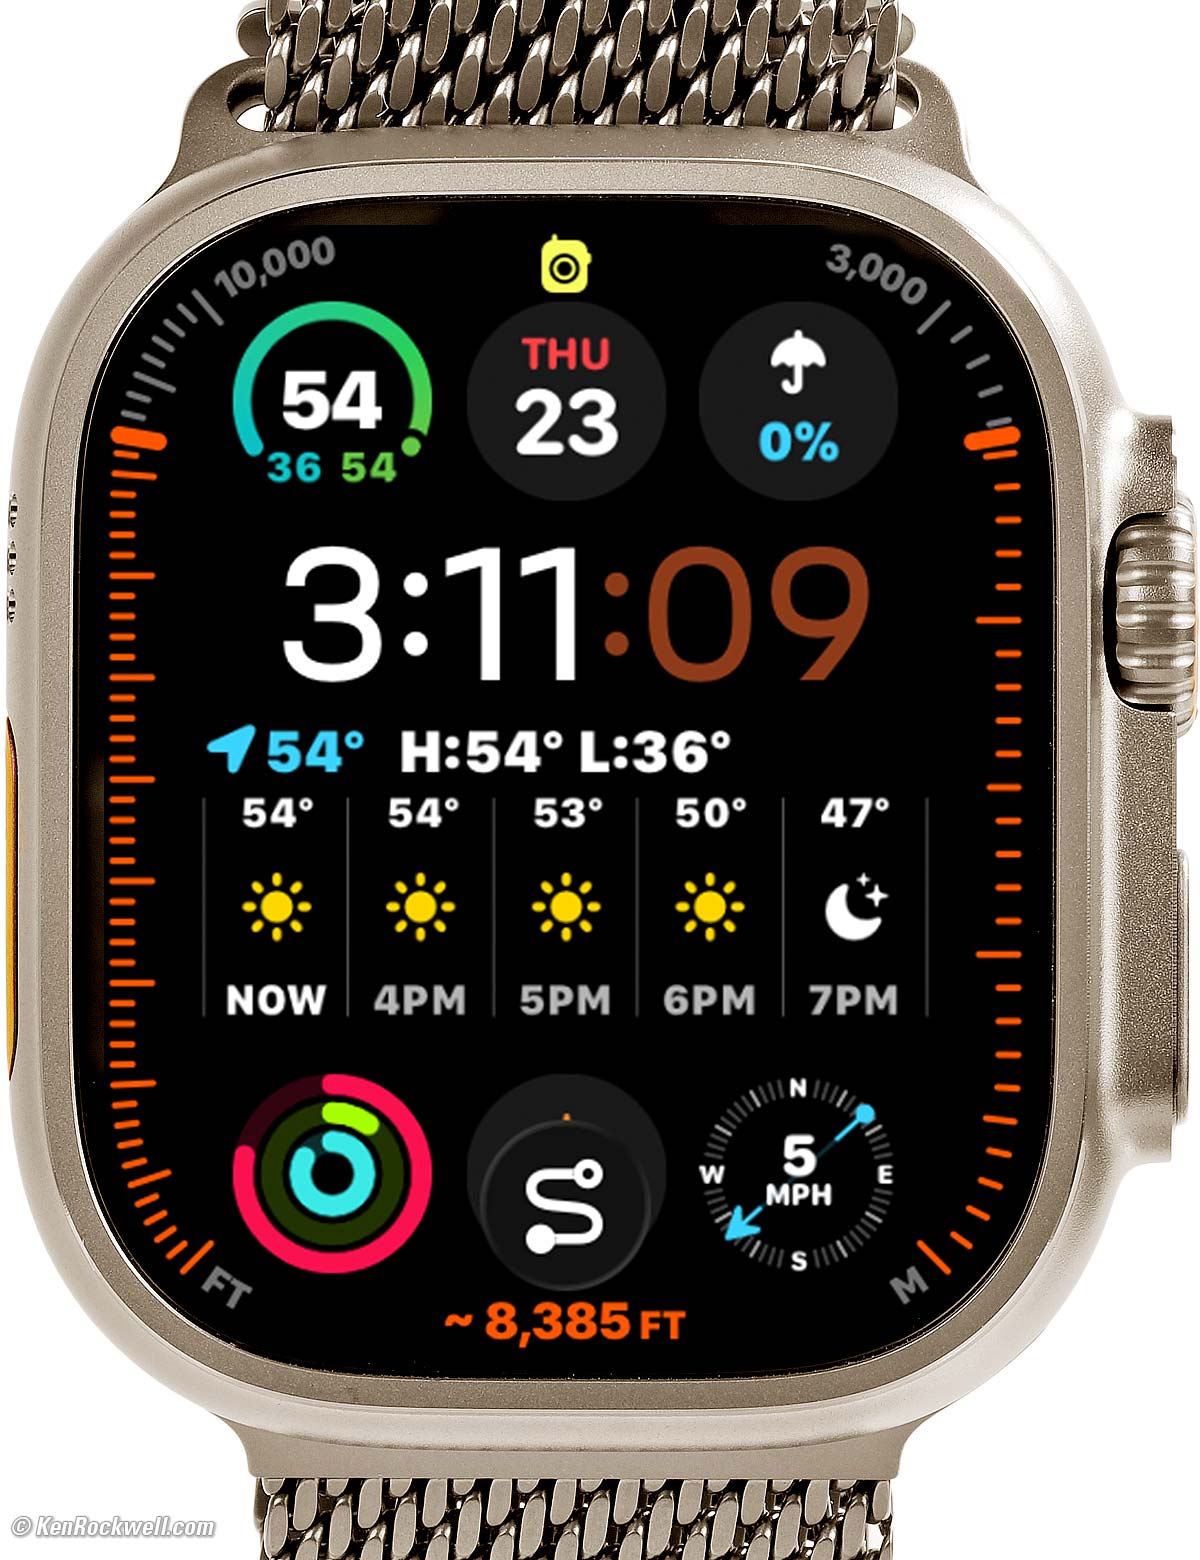
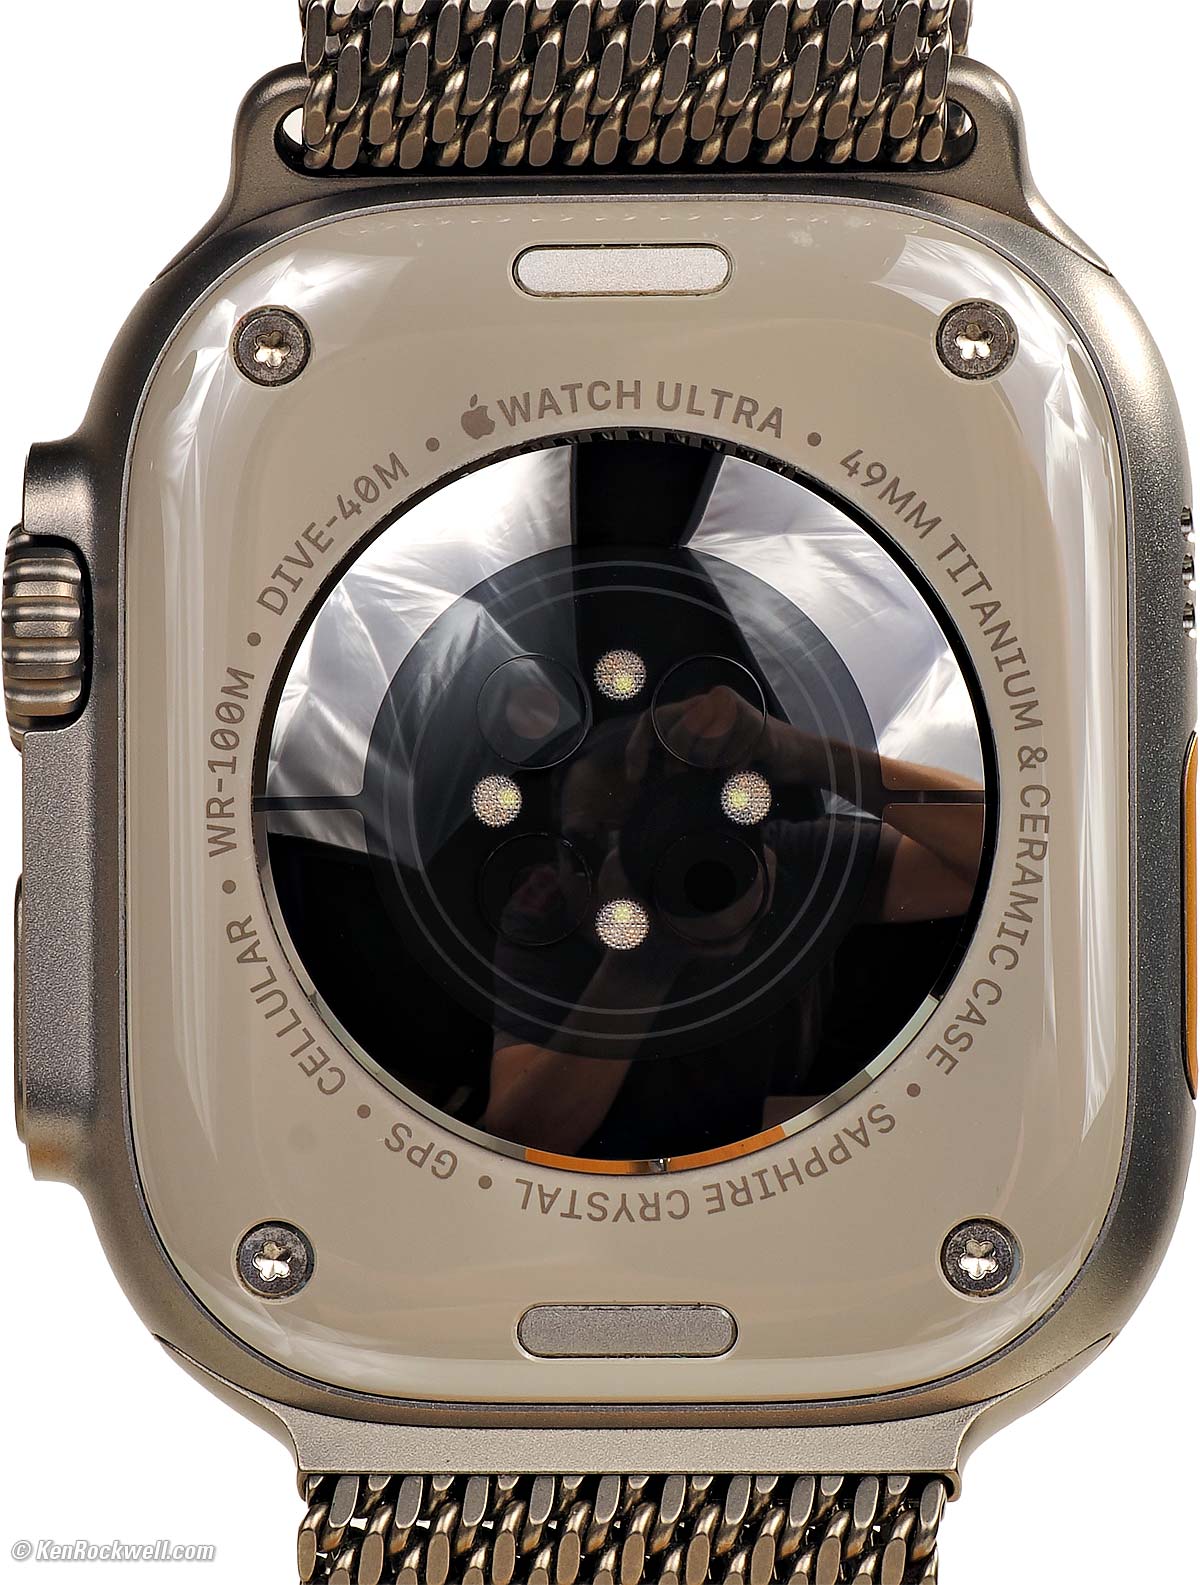
Apple Watch ULTRA 3 in Natural Titanium at Bodie, California (3,000 nits peak, 514 × 422 pixels at 326 PPI LTPO3 OLED always-on display, 3.325 oz./ 94.3g total with 49mm Natural Titanium Milanese Loop band (medium) as shown). I'd get my Apple Watch ULTRA 3 at Adorama, at Amazon or at eBay, or any Apple Watch at Adorama, at Amazon, or at eBay if you know How to Win at eBay.
This all-content, junk-free website's biggest source of support is when you use those or any of these links to my personally-approved sources when you get anything, regardless of the country in which you live. Get yours only from the trusted sources I've used personally for decades for the best prices, service, return policies and selection. Thanks for helping me help you! Ken.
April 2026 Apple Reviews Watch & Clock Reviews All Reviews


I buy only from these approved sources. I can't vouch for ads below. |


Initial Setup user's guide top
I'd get my Apple Watch ULTRA 3 at Adorama, at Amazon or at eBay, or any Apple Watch at Adorama, at Amazon, or at eBay if you know How to Win at eBay.
Use the Watch app in your iPhone to connect the watch to your phone.
Follow the directions to get started.
After you get it all started you can make many settings either in the Watch app in your phone or at the Settings app in your watch.
Ideally restore this new watch from a backup of your other watch to save you from having to set everything again from scratch.
App Installation user's guide top
First download apps on your phone, and then load them from your phone into the Watch using the Watch app on your phone.
Be sure you set each app in My Watch (bottom left tab) to install on your Watch.
Power & Charging user's guide top
It charges via USB with the included Apple Watch USB-C Charging Cable. It charges at about 1.6% per minute while drawing 5⅓ W.
The included Apple Watch USB-C Charging Cable charges about three times faster than the old USB-A charging cable, not that it matters overnight.
There is no USB-C AC charge adapter included; c'mon, we all have USB wall adapters or computers or cars or power banks with USB sockets.
It's AOK to leave it charging all night; it shuts off when full.
You don't need it if you have a power bank, but there are also self-contained portable chargers with built-in batteries.
Wireless Charging Stations
While I have loads of Charging Cables, I really love my Petino Samba Pad Pro 3-Way Wireless Charging Station to charge my iPhone and watch every night:

Petino Samba Pad Pro 3-Way Wireless Charging Station.
There are loads of other wireless charging stations.
Cellular Data (5G LTE) user's guide top
If you activate it with your carrier, your watch works perfectly while out and about even without your iPhone around. That's the point of activating Cellular Data: it can work all by itself in the field. Go for a run, out to dinner, bike ride or swimming in the ocean and leave your iPhone at home, and everything on your watch — even the Phone app for making telephone calls — all work as they always do.
The gotcha is that it costs $5~10 a month paid to your carrier (Verizon, AT&T etc.) for cellular service, which only makes a difference if you're away from Wi-Fi and away from your iPhone, which most people never are.
If you always have your iPhone with you, you don't need to activate Cellular data. The Apple Watch doesn't use cellular data, even if you have and pay for it as I do, when your iPhone is around because cellular uses much more battery power than Wi-Fi or a direct connection to your iPhone (and letting the big battery in your iPhone take care of communication to the cellular system).
If you're at home, work, or school and leave your iPhone elsewhere or turned off, your watch connects with Wi-Fi and works great — again, no cellular needed. Even before I had cellular on my watch I loved that my iPhone could be in one part of the house, and if a call comes in, it rings on my watch over Wi-Fi even if I'm out in my backyard Jacuzzi. It's all transparent; the Watch just works and you don't have to do anything; it swaps among connections and networks all by itself.
The Apple Watch only uses cellular when your phone or Wi-Fi isn't around. Cellular uses a lot of battery power. Think about it: usually the watch talks to your iPhone two feet away with Bluetooth, or Wi-Fi in your house 20 feet away, but LTE has to transmit enough power to make it to a cell tower potentially a mile away.
Even if your iPhone or Wi-Fi is always near, a nice reason to have cellular activated is if you're taken hostage or enter a secure facility where you no longer have your iPhone, or if your Apple Watch is lost or stolen. You can use the Find My app on your Mac or iPhone to locate your watch transmitting all by itself.
Double Tap Thumb and Forefinger to Answer Phone user's guide top
My hands are always full, so this is a huge help answering my calls that only seem to come in when I'm hauling things.
You can set these either in the Watch itself at Settings, or on your iPhone in the Watch app at My Watch and scrolling down to the options.
Go to Settings > Gestures > Double Tap > ON. When you do this, you'll see a tiny blue icon that sort of might look like a hand pinching when you double tap, and when you double-tap thumb to forefinger, it answers or hangs up — but its slow to respond and it seems to ignore me if I tap right as the call starts ringing
or
Go to Settings > Accessibility > Assistive Touch ON, and set Hand Gestures Off. When you do this, an incoming call will show a big box that says DOUBLE TAP TO ANSWER, and then a box that says DOUPLE TAP TO HANG UP while you're on the call. I prefer these more obvious indications, and they seem to let me answer my calls right as they come in.
Ultimately which of these you prefer depends on what other crazy gestures and accessibility shortcuts you prefer to use — or not.
Classy British Voice user's guide top
If you're James Bond or otherwise want your watch to speak in a more interesting voice, in Settings on your watch or in your iPhone select Apple Intelligence & Siri > Siri Requests > Voice and pick British (Voice 1).
Your friends will be amazed, and there are plenty of other options. I'm still waiting for Cheerleader, Drill Sergeant and other funny voices.
Have fun.
Swipe to Switch Watch Face user's guide top
To swipe to switch faces:
|
|
|
Press crown to find Settings in your Watch. |
Select Clock. |
Turn on Swipe to Switch Watch Face. |


To activate this, simply:
1.) Press your Apple Watch crown to see all your apps.
2.) Scroll down to the gear icon (settings).
3.) In settings, scroll most of the way down to Clock.
4.) In Clock, turn on Swipe to Switch Watch Face.
Done!
Speak the Time user's guide top
In Settings on your Apple Watch, tap Clock, then turn on Speak Time. Now hold two fingers on the watch face and it will say the time.
To hear the time, be sure you have the ringer activated (tap the right-side button and see the bell icon), then hold two fingers on the face for a second until it speaks.
If the Apple Watch is awake, then hold two fingers on the face for two seconds and it will speak as you remove them. It's much easier with the watch in its usual "always on" idle state, in which just applying to fingers for a second will make it speak.
It won't work if your watch is in Silent Mode unless you select Always Speak.
Disable Silly Interruptions user's guide top
I had Siri set for "Raise to Speak" in the Watch app in my iPhone back around 2024 so that all I had to do was lift my ULTRA 3 and say "Call Home" or whatever, but all too often Siri would think I was talking to her and say crazy things for no reason as I went about my day. Turns out Siri wasn't smart enough to ignore me when my watch was raised but I wasn't talking to her.
I fixed this in the Watch app in my iPhone by setting: My Watch > Siri > Raise to Speak > OFF.
I've not missed this; as technology marches on it probably no longer has as many annoying false activations.
Hour Chimes user's guide top
To get a Ding! and a Poke! every 15 minutes, in the Watch app on your iPhone select the My Watch tab at the bottom, then scroll down to Clock > Chimes > ON.
Screen Shots user's guide top
To grab a screen shot from an Apple Watch ULTRA 3, press the crown and the right side button at the same time. A PNG is saved in your iPhone's Library photo album.
Long Workouts & Low Power Modes user's guide top
I haven't had to use any of these power tricks since my Series 5, but here they are for reference.
During workouts the heart rate sensor is ON continuously. That's the bright green LED on the back of the watch, which uses a lot of power. Normally your watch only checks heart rate every ten minutes or so unless you're working out.
You have the choice of both a Low Power mode for workouts that uses the screen less, and another slider to reduce the frequency of GPS and heart-rate updates.
Set either of these in the Watch app in your iPhone at My Watch (lower left) > scroll down to Workout > Low Power Mode or Fewer GPS and Heart Rare Readings > ON.
The Low Power mode here enables the Low Power Mode automatically only while you're doing a workout, and otherwise you're in regular mode.
You also can set Low Power Mode on the watch at the Settings App > Battery > Low Power Mode > ON, but that won't come out of Low Power Mode when your workout is done as it does if you set it under Workout in the iPhone app.
In olden days on century (100 mile) bike rides we could keep a tiny self-contained charger in our tool bag and recharge during rest stops or lunch. You probably could complete the RAAM (Race Across America) this way, but remember to charge the tiny charger and your watch every night.
If you have a locker without a power socket, take a USB power bank and Charging Cable (or a self-contained portable charger) in your bag and you can charge while you hit the showers.
Thank goodness my Apple Watch ULTRA 3 has never required any of these tricks, it just goes and goes and goes.
24/7 Power user's guide top
If you want to wear it 24/7 to track sleep, it charges at about 1.4% per minute with the included Apple Watch USB-C Charging Cable, so if you charge it while you're getting ready in the morning and getting ready for bed at night, that may be enough minutes each day to keep it charged all the time. I haven't tried
Continuous Heart Rate Monitoring user's guide top
If you want heart rate to readout at about once per second, go to the Heart Rate app and touch the crown with the tip of your finger, just as you do to read EKGs.
Find my iPhone user's guide top
 |
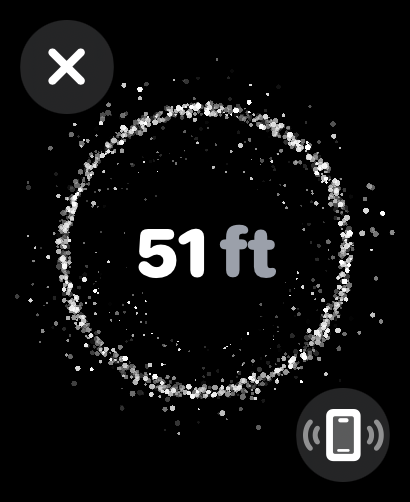 |
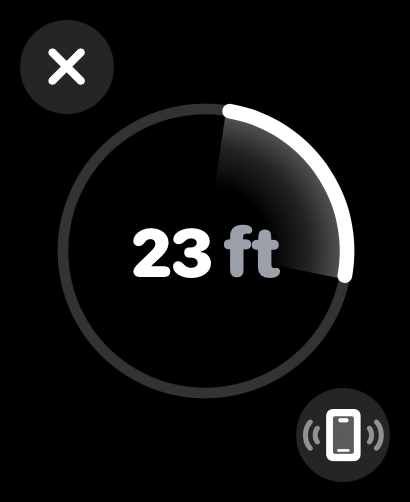 |
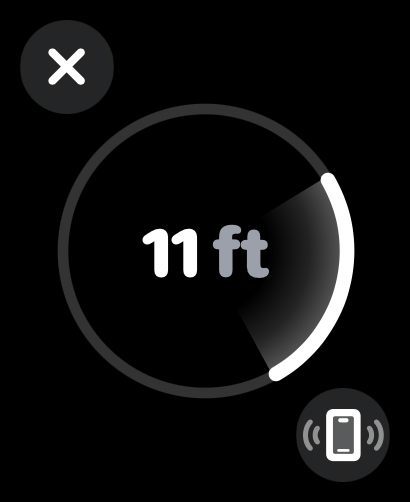 |
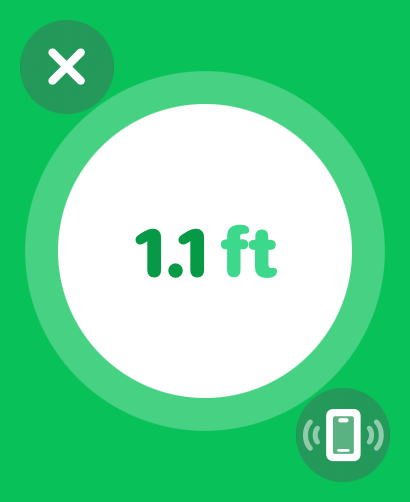 |
| Tap the right side button to see this, then tap the ping my iPhone icon | You'll see this. Get closer and you'll see | this display that now shows direction. | Get closer and you see this, until you get so close | that you see this and the phone pings by itself. Bravo! |
Backups user's guide top
It should back up by itself to your iPhone, which in turn you should have set to be backing up automatically to iCloud each night.
The reason you care is that it's surprising how much there is to set on a Watch, so if you don't have a backup it may take a while until you get your watch all set up as you like it.
HINT: Make screen shots of all your watch faces. Trust me; if you have to set them up again you'll be glad you saved them when you did.
You can check the last backup in your iPhone at Settings > General > iPhone Storage > (scroll down a huge list of apps, maybe halfway down to Watch) > and you'll see all the watch backups.
If you're like me and have had several older watches, you'll see backups for each, along with the date it was backed up.
If you unpair your watch from your iPhone, it backs up so when you re-pair it or a new watch, it will by default copy the most recent backup into the watch you're pairing. Backups store all your faces and settings and which apps you have loaded where.
To force it to backup, unpair it at your iPhone (Watch app > My Watch > All Watches > (find the watch you want to backup and unpair) > tap the (i) on the right side > Unpair Apple Watch.
Don't rush the process, what's taking time is the watch backing itself up to your iPhone. Even after it says it's completed the backup. It may be a couple of hours before that backup appears in my iPhone Settings > General > iPhone Storage > (scroll down a huge list of apps, maybe halfway down to Watch).
Once unpaired and thus backed up, pair it again and it should be restored from the backup you just created by unpairing — IF the backup appears. Good luck; this rarely goes smoothly for me, another reason I suggest saving screen shots of all your watch faces while you can 😁.
Migration to a New iPhone user's guide top
If you are migrating to a new iPhone the pairing should transfer magically to the new iPhone, automatically unpairing from the old iPhone in the process and pairing to the new one.
If there's a problem transferring data to your new iPhone, be sure to unpair your watch from your new iPhone before you try data transfer again. If you don't unpair from the new iPhone before restarting a data migration from the old phone you may orphan your watch. I learned this the hard way: a watch only reconnects to its paired iPhone, but if it's migrated to a new iPhone which you then erase and start a transfer again from an unpaired phone, you lost any pairing.
Once you lose the pairing by re-trying a transfer from the old, no-longer paired phone, you just orphaned your Watch because it's unpaired to any iPhone.
When a Watch is no longer paired to any phone, there is no way to restore the Watch settings other than by starting everything again from scratch. I had to erase the Watch at the Watch itself, and then restore it from a backup on my iPhone, but by the time I did this there was no backup of my current Apple Watch, since I had never unpaired it to back it up! Instead I had to restore it from a 2-year old backup of an older watch that was on my iPhone, which was the newest backup I had since apparently I had no backups of my current watch in all this.
After I went through this and got my watch set up again (which takes longer than you'd think because there are so many set up options), unpair your watch and let it take its time to back up. Once that's done, re-pair the watch and you should be good to go.
It's supposed to backup automatically all the time, but I don't see that happening. This was a few iPhones ago and hopefully Apple has stupid-proofed the system better today — but I'm not going to try it!
HINT: What takes the longest to restore are our preferred watch faces. Make screen shots of each face, and from these it's easy to recreate them. You'll thank me!
Transfer Your Existing BMW Digital Car Key to Your New Watch user's guide top
Skip this unless you have a BMW from about 2020 or newer. This is new technology that only works with BMWs from about year 2020 and isn't in any Porsches or Mercedes as of 2026.
I use BMW Digital Keys to unlock and drive my BMWs. I do this by holding my watch or iPhone up to the driver's door handle, and voilà, it unlocks or locks, and putting my Watch or iPhone in the charging tray lets me start and drive it exactly the same as the regular key. I own a lot of cars and don't want to carry all my physical keys with me; people are always laughing at how many physical car keys I have on my key ring, so anything to lighten the load is welcome.
No one at BMW knew how to do this; the digital key in your older watch does not magically transfer to a new watch.
The trick is you can't just share the existing key from your iPhone to your new Watch (but try it in case it works); you have to get a new BMW digital key invitation into your iPhone, and then transfer it to your new watch. Details follow.
I apologize that BMW is not Apple and that none of this is properly documented or familiar to anyone at my BMW dealer, BMW's genius help lines or online or app resources. Sorry, but this is why I share what I learned the hard way. This process, even when you've done it before, is horribly aggravating as even the on-screen instructions from BMW are unclear and it takes quite a few tries to get it to work. The user interface for this in iDrive 8 is horrible, expect to have to retry everything 27 times.
First try to add your existing BMW Digital Key to your new watch from your iPhone's Watch app at My Watch (bottom left tab) > Wallet & Apple Pay > select your relevant BMW > [ADD]. If you get an error, you need to get a fresh copy of the Digital Key. To do this:
1.) Delete the key from the Wallet app in your iPhone.
2.) Use the My BMW app in your iPhone, select your car, find the Digital Key option, grab both physical keys and go sit in the car and follow the horribly poor instructions to set up the Digital Key in your iPhone.
3.) Now add it to your watch from your iPhone: Watch app > My Watch (lower left tab) > Wallet & Apple Pay > select the relevant BMW > [ADD].
If this key was shared with you by someone else registered as the BMW's owner, they'll have to share it with you again.
To keep this complicated, I had just given my old iPhone to the BMW's owner, and now she now needed to get a new Digital Key into her new phone before she could give it back to me! Arrgh!!!
Getting the Digital Key into your iPhone in the first place requires you use the My BMW app in your iPhone, select your car, find the Digital Key option, grab both physical keys and go sit in the car and follow the horribly poor instructions to set it up in that iPhone.
Once you have a Key in the BMW owner's iPhone wallet,
1.) Delete the key from the Wallet app in your iPhone.
2.) Get a new invitation via text from the BMW's owner's Wallet app. Have them select the Key in their Wallet app in their iPhone and then hit the Share options and send it to you via text.
3.) Receive this key by clicking the text you just received.
4.) Add it to your wallet on your iPhone.
5.) Now add it to your watch from your iPhone: Watch app > My Watch (lower left tab) > Wallet & Apple Pay > select the relevant BMW > [ADD].
Whew!
Now that you have the new BMW digital key in your new Watch, even though it will unlock and drive, it won't be recognized automatically to reset the seat positions in your BMW until you go into your BMW's big iDrive 8 dashboard screen and go to the screen where you can set up options for BMW IDs. Get there, and:

Hit your BMW ID Icon at the top right (bigger) to get to the Manage BMW IDs Screen:
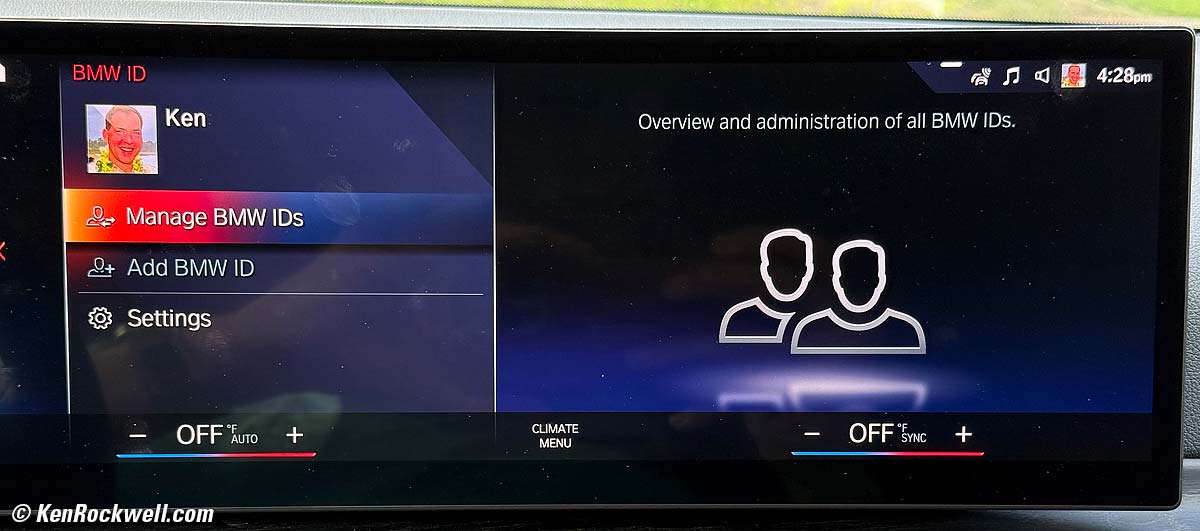
Now hit SETTINGS to set Driver Recognition to set how it identifies who's driving so it can set the seats for you:
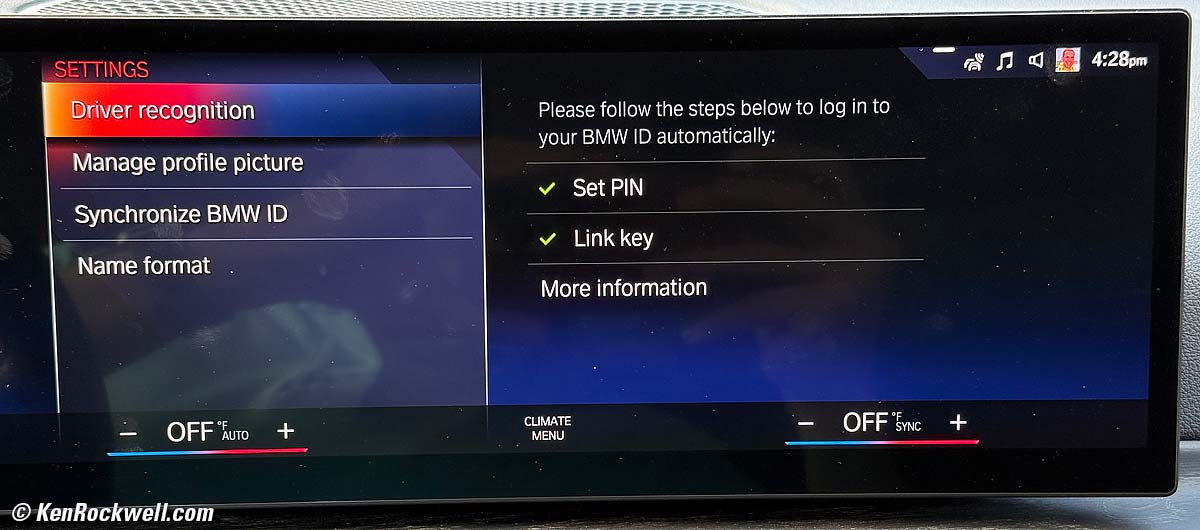
Be sure you've set a PIN (good Lord), and then you can hit Link Key:
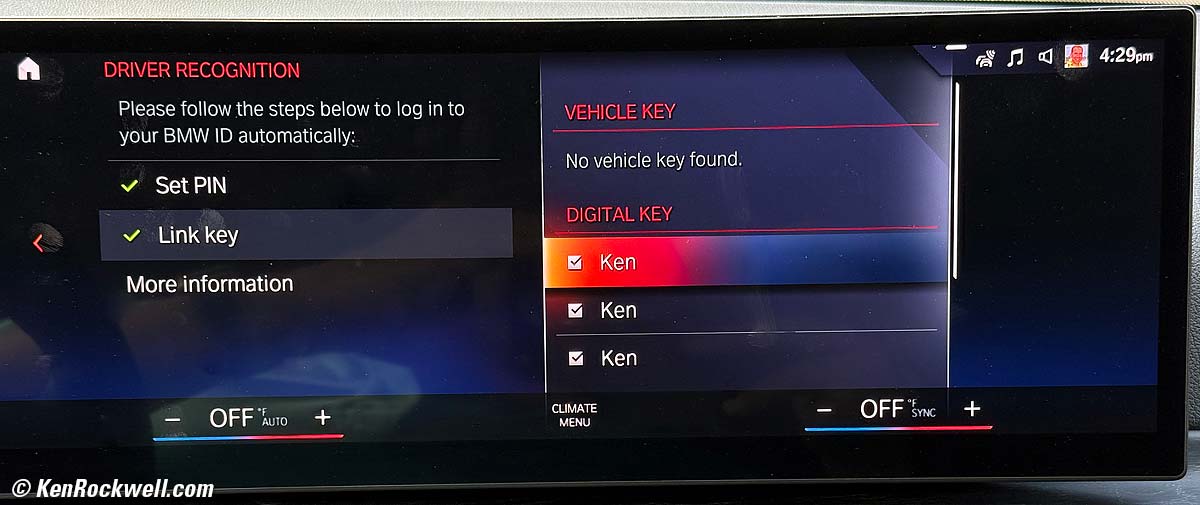
"No vehicle key found" means I don't have (and don't need) the regular physical key to set these, once I've gotten the digital keys all set.
"Ken" refers to one of the digital keys stored in an iPhone or Apple Watch. The BMW is not smart enough to let us know which "Ken" is which. One of these "Kens" is my ULTRA 3, another is my ULTRA 2, another is my Apple Watch Series 10 and another is my iPhone — but I have no idea which is which.
To set this BMW to recognize and reset everything for you when you use a particular digital key, stick it in the wireless charging tray. You'll see it pop up under DIGITAL KEY, unchecked. Check the box for it to recognize that key. I had to do this a while, putting each of my Apple Watches and then iPhone in the tray and checking the box, in no particular order.
A trick is that it's easy to think it's set because you'll see "Ken" checked, but if you haven't yet put the particular Watch or iPhone in the tray and checked its box yet, you won't see it appear unchecked until it makes it into the tray - even if you used it to unlock the door. It took me weeks to figure this out, and until I did, every time I got in the car it reset the seats to fit my little daughter and I could barely fit to reset them to me.
This is even more difficult to do rather than to read. I'm probably the only one to ever have figured this all out, and I wrote it down so I can figure it out for the next time.
Map My Ride app (mostly obsolete) user's guide top
I've been using the free Map My Ride app to track my bike rides and runs for years before I got my Apple Watch. The Watch's included Workout app does the same thing. This section originally is from back in 2019 when I got my first Apple Watch Series 4 and started to close rings the same day we started to talk (thank you, Ryan & Doe).
Today the Apple Watch does everything the Map My Ride app does, so I don't see much point of using Map My Ride unless you want a different view of each workout. Map My Ride gives faster, clearer plots of my elevation and speed as graphs versus ride time, while the Apple Watch apps display speed as a color coded route on a map on my iPhone — but without plotting the elevation.
While both apps show your path on a map, Apple color-codes your relative speed throughout your route — while Map My Ride plots elevation and speed graphically.
I run the Apple Workout app at the same time as Map My Ride. I still use both all the time in 2026 out of habit and so I can see both interpretations.
Map My Ride works with the Apple Watch, so you can control it and read it on your watch. You can also see both apps on you iPhone, so it's all good.
Update the settings in Apple's Health app in your iPhone to link Map My Ride's data with Apple Health. Map My Ride certainly records the data perfectly inside Map My Ride when you control it with the watch, but it might not share data with your watch and your Health app unless you activate communications between the two in the Health app settings.
It works best for me to start Map My Ride on my iPhone, then start a workout on my watch so they both run at the same time.
Like everything, all the apps get better all the time so whenever you read this it may have changed.
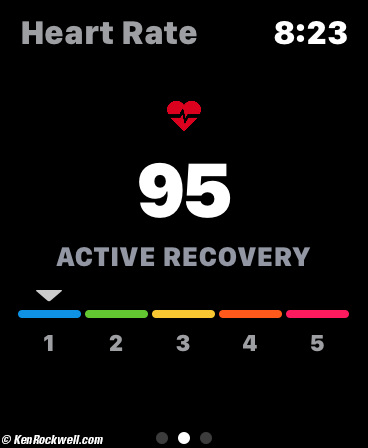
Map My Ride records percentage of effort based on heart rate thusly:
100 BPM 0%
110 BPM 8%
120 BPM 20%
130 BPM 32%
140 BPM 43%
150 BPM 55%
160 BPM 67%
170 BPM 79%
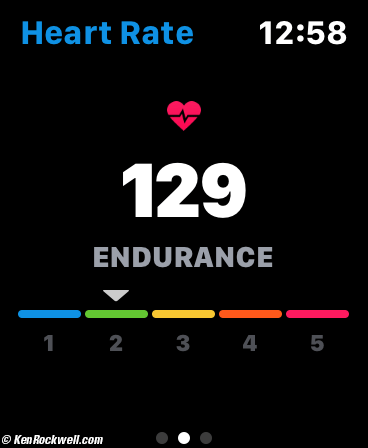
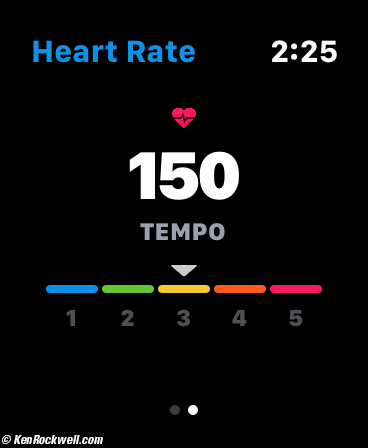
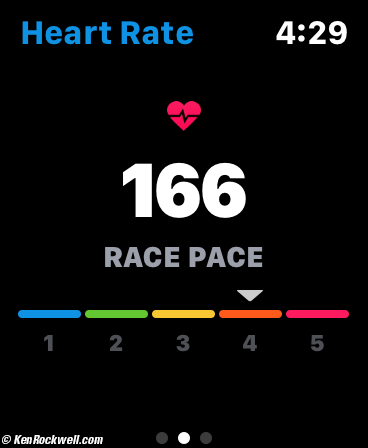
Map My Ride divides heart rates into five zones:
| Zone 1 | Zone 2 | Zone 3 | Zone 4 | Zone 5 |
| 50-60% of maximum heart rate | 60-70% of maximum heart rate | 70-80% of maximum heart rate | 80-90% of maximum heart rate | 90-100% of maximum heart rate |
Easy You're talking normally without having to stop to breathe. |
Easy to Moderate You're probably taking a short breath after each sentence. |
Hard You're taking a deep breath after each sentence. |
Very Hard You're taking deep breaths every few words. |
Exhausting Unable to speak; you're breathing as hard as you can. |
Active Recovery |
Endurance |
Tempo |
Race Pace |
Maximum, Capacity |
Here's how your heart rate looks displayed as you're riding (among many other possible screens, these grabs from my Apple Watch Series 4):
 |
 |
 |
 |
More at Training with the Apple Watch.
I'd get my Apple Watch ULTRA 3 at Adorama, at Amazon or at eBay, or any Apple Watch at Adorama, at Amazon, or at eBay if you know How to Win at eBay.
© Ken Rockwell. All rights reserved. Tous droits réservés. Alle Rechte vorbehalten. Alla rättigheter förbehållna. Toate drepturile rezervate. Niciun vampir nu a fost implicat în crearea acestei lucrări. Doe! Omnia jura reservata. Ken Rockwell® is a registered trademark.
Help Me Help You
I support my growing family through this website, as crazy as it might seem.
The biggest help is when you use any of these links when you get anything. It costs you nothing, and is this site's, and thus my family's, biggest source of support. These places always have the best prices and service, which is why I've used them since before this website existed. I recommend them all personally.
If you find this page as helpful as a book you might have had to buy or a workshop you may have had to take, feel free to help me continue helping everyone.
If you've gotten your gear through one of my links or helped otherwise, you're family. It's great people like you who allow me to keep adding to this site full-time. Thanks!
If you haven't helped yet, please do, and consider helping me with a gift of $5.00.
As this page is copyrighted and formally registered, it is unlawful to make copies, especially in the form of printouts for personal use. If you wish to make a printout for personal use, you are granted one-time permission only if you PayPal me $5.00 per printout or part thereof. Thank you!
Thanks for reading!
Ken.